MG Tools
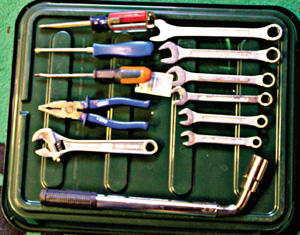
Those of us who have the time and/or inclination, enjoy carrying out mechanical work on our MGs. Every task, from simply changing the oil and filters, to a full blown restoration, engine change and the like will require suitable workshop tools. It is also a good idea to carry a few basic tools just in case of a breakdown, when they may turn out to be all you need to get you on your way.
Basic in car tool kit – MGB etc
- A set of combination spanners 7/16 – 3/4 AF
- A decent telescopic wheel nut tool
- An 8-inch adjustable spanner
- A Phillips no 2 screwdriver
- An 8-inch standard screwdriver 1/4-inch tip
- A 6-inch screwdriver 1/8th inch tip
- A pair of 8-inch pliers
Basic in car tool kit – Maestro, Z, MGF
- A set of combination spanners 8MM – 19MM
- A decent telescopic wheel nut tool
- An 8-inch adjustable spanner
- A Pozidrive no 2 screwdriver
- An 8-inch standard screwdriver 1/4-inch tip
- A 6-inch screwdriver 1/8th inch tip
- A pair of 8-inch pliers
Make sure you know where the locking wheel nut socket is!
Basic Servicing Tools
I shall assume for the purposes of this article, that “basic servicing” amounts to carrying out an oil change and replacing brake pads. In order to carry out an oil change you need just three things.
Fig 1: Basic Tools
- Something to drain the oil into
- An oil filter wrench
- A socket or key to fit the sump drain plug
It is best to use a container that is capable of holding well over the oil capacity of the engine, but shallow enough to fit under the sump. Mine, which I have illustrated, has two handles and a pouring notch in the side. You must be able to dispose of the used engine oil correctly. A 25 litre metal or plastic container plus a funnel makes life easier. When this is full the oil can be disposed of at your local council recycling site.
There are a number of different tools available to remove oil filters. They may go on “finger tight” but it takes a lot more effort to get them off. The sorts of tools available include straps, chains and other means of gripping the filter. I use a device, which tightens onto the filter as you rotate it with a 3/8-drive ratchet handle. Pictures speak better than words! Lastly you need a socket to undo the sump drain plug. I always (except in the very rare case where it is unavoidable) use Hex sockets, not Bi-hex ones as they grip better. In case you are not familiar with the difference see Fig 2. By the way, be aware that the sump drain plug is very likely to drop into the oil container as you loosen it.
The need to use sockets and ratchet handles brings us to the fact that a good 3/8 drive Hex socket set is invaluable for any service work on your vehicle. For the earlier cars an AF or Imperial set is needed, a metric one for the others. Talking about sockets: 95% of the jobs you do on a car can be handled using a 3/8-drive socket set.
Unless you intend to do much more than straightforward service work, I should not get a 1/2-inch drive set. However you may be tempted by combination 1/4 inch – 3/8 inch drive sets which are more expensive, but very useful. I can recommend sets from Britool, Axminster Power Tools, Clarke, Sealey, Teng and many others. Never buy cheap tools, but don’t buy “Snap on” tools they are very expensive and nearly every other manufacturer these days will give you a similar guarantee for their tools.
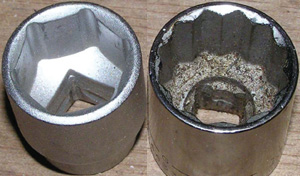
Fig2: Hex and Bi-hex sockets
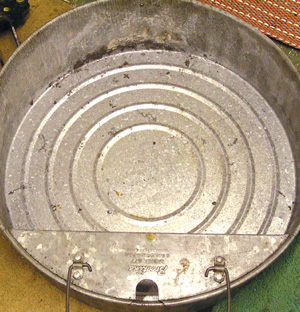
Fig 3: Oil drain pan Born in the USA!
For brake work, the main tools you will use will depend on the age of the car.
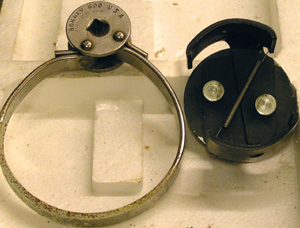
Fig 4: Oil Filter Tools. Bob prefers the one on the right
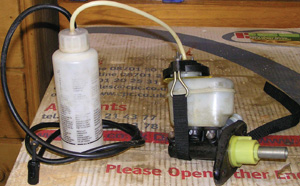
Fig 5: Pneumatic Brake bleeder kit
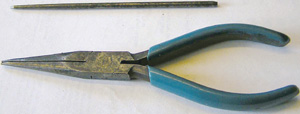
Fig 6 : Long-nose pliers & scriber
A pair of long or snipe nose pliers are useful as is a strong pointed tool like a scriber. These are to extract the split pins securing MGB pads. You will also need brake spanners to loosen and tighten bleed nipples whilst a bleed tube is attached and brake adjustment spanners for the rear brakes. Obviously earlier cars will use imperial/AF sizes and later cars metric. Make sure that you have sockets and spanners in both 12mm and 14mm for work on the later cars.
MGB brake drums are secured by Phillips headed screws. They are sometimes very tight and it makes sense to use this as an excuse to get an impact driver with a variety of tips both Phillips and Pozi. I always replace these Phillips type screws with socket headed countersunk items, because they are a lot easier to remove.
There are many ways of bleeding brakes, as I am sure you are aware. I can recommend the use of a device made by Gunsons which uses air sourced from the tyre on your spare wheel to exert pressure on a container of fluid and thence the fluid reservoir. Fig 5 shows a mock-up of the unit itself connected to the reservoir. The unit comes with adaptors which fit straight on to the MGB master cylinder, but an auxiliary kit is necessary to fit onto a standard Rover/MG master cylinder. You can get the Bleed kit from stores such as Halfords but I had to go direct to Gunsons for the auxiliary master cylinder attachments.
Major Engine, Suspension and Electrical work
If you contemplate carrying out this sort of work you are going to need quite a few more tools so expect to spend a fair amount of money.
With the tools you already have, you can take care of the majority of the work on an MGB for example. A good 1/2-inch drive torque wrench calibrated in ft/lbs, and a set of imperial feeler gauges will be needed. I should recommend getting a 1/2-inch drive imperial socket set from one of the manufacturers I mentioned earlier. Lastly a very useful tool I made to lock the crankshaft on my V8 is illustrated below.
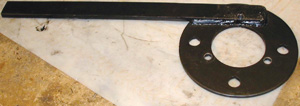
Fig 7: Crank locking tool (V8)
Now for the various K series engined cars:
Let’s start with something which had come to be a major problem; head gasket failure. Roger Parker has clearly described the head gasket history in a past issue of Enjoying MG (October 06). Currently multi layer gaskets as designed for the Freelander are readily available to replace the originals. Dave Andrews who modifies all my K series heads feels that the last of the old style gaskets are perfectly OK as long as you make sure of a couple of things when refitting the head.
- Cylinder liners should all stand 4 thou proud of the block face (beware odd liners as there were some sets manufactured 11/2 thou shorter than currently available)
- If the head has been skimmed more than 15 thou – the thickness of surface hardening – you must use a saver shim (included in the multi layer sets) I believe thicker saver shims up to 30 thou are available.
The next few figures will illustrate the various tools you must have to replace a cylinder head gasket and I shall explain the function of each one.
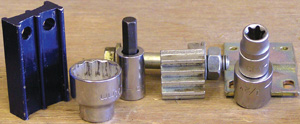
Fig 8: Tools for gasket change
From left to right in Fig 8 above:
- Locking Tool for Cam pulleys
- 22mm x 3/8 drive socket to rotate crank
- 8mm Allen key for tensioner roller
- Flywheel locking tool
- T12 Socket for cylinder head bolts on 1/2 inch drive adaptor
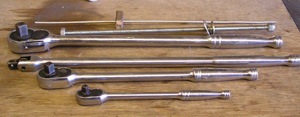
Fig 9:
From back to front in Fig 9 :
- Aluminium probe for setting pistons height to 90deg
- Cylinder liner Locking rod
- Extra long 1/2, 3/8, 1/4 drive ratchet handles and a 3/8-breaker bar The longer ratchets and breaker bar are well worth having as they give you that extra leverage to loosen tighter bolts such as those used in suspension and securing brake calipers
Fig 10: Three adaptors are shown.
In combination with a cordless drill and suitable sockets these can be used to rapidly extract and insert items such as cam cover and cylinder head bolts – once loosened in the normal manner.
(Thank-you Dave Andrews)
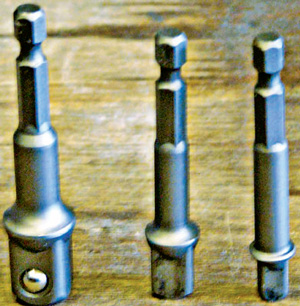
Fig 10: Cordless drill 1/2, 3/8 & 1/4 socket adaptors
Fig 11: Torque wrenches
From left to right above are a Britool 1/2-inch drive, a Britool 3/8 drive and a Williams 1/2 drive Torque wrench. When you have used a Torque wrench you should always slacken it off so that it is not left in tension.
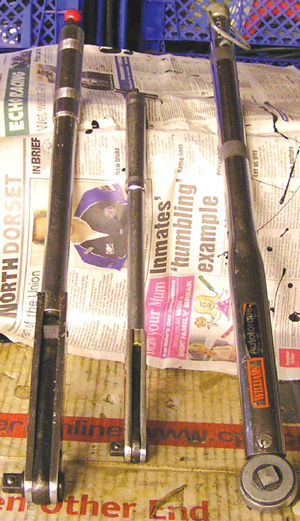
Fig 11:
Fig 12: Ratchet spanners
Also very useful are a range of ratchet spanners. Shown above is my set running from 8mm to 22mm. Many have flexible heads which give you – flexibility.
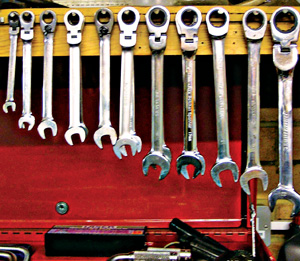
Fig 12: