MG ZT XPower 500 Rebuild
The story behind the original development of this car was covered in the April 2006 issue of the magazine and now we will review the quite considerable progress made with restoring the car’s appearance and more to the point, getting it running.
A case of two steps forward and one-step back, or occasionally one step forward and two steps back. This all started when we first collected the XPower as its extended track and wheel arch bodykit proved too wide for most car trailers.
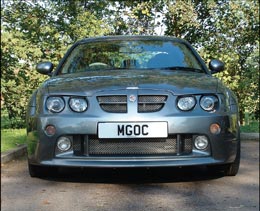
XPower 500’s wide arched stance with special front end incorporating the 2004 headlamps and lower bib front spoiler
Once back at the MGOC Workshop the first job was to assess what would be needed to be done and draw up a plan of action. The XPower’s one off ‘concept’ nature meant there were no mainstream specifications available and the skilled people involved in the car’s build were now scattered to the four winds.
When the XPower was purchased by the Club it was missing the special wide arch front panel and bonnet, one door spat, while both rear wheel arches had been partially cut away. There were drilled holes in the front arches and a considerable amount of small-localised damage to the paint on every panel. The final colour change to Monogram Aurora was clearly very comprehensive as this colour was in almost every hidden cavity of the car.
Other changes since the car was last seen in public in Sept 2003 were the fitting of 2004 model year headlamp units and a heavily revised rear bumper with very pronounced square lines and angular raised exhaust surrounds. The original exhaust rear boxes were missing, but as we discovered the new rear bumper meant they wouldn’t fit anyway.
The original multi spoke wheels were still fitted to the car, albeit loosely and the wrong way around. Also there was a worrying drip of coolant from under the radiator (it had been crushed). This was a specially constructed alloy one and beyond reconditioning. The car was a non-runner for other reasons and information passed down to the Administrator’s agents, and then to us, was that the engine was suspected as having no oil pressure. The spectre of a dead engine was not relished, as not only was this a rare engine to find in the UK it was also a one off spec developed by Prodrive. However, this information, like much else relating to this car, was taken with a pinch of salt and our assessment would confirm or deny this rumour. As it turned out the lack of oil pressure was nothing more than a disconnected sensor wire, but the non-starting was more involved.
The engine and its management are basically US Ford Mustang Cobra items, a bonus as we could always refer to info for that car. To get the extra power a Vortech supercharger kit had been added and then boost and mapping tweaked by Tickfords to achieve the 500 bhp goal.
In the Mustang Ford’s engine management system controls the fuel injected by regulating the time the injectors are open, but in addition the fuel pump is also regulated to alter the pressure of fuel it delivers, different to many European cars where fuel is maintained at a specific fuel pressure above the pressure in the inlet manifold. This is an added complication which in the way the XPower 500 was configured has been a pain.
The Ford EEC V engine management ECU controls a subordinate control module that regulated the fuel pump. This module, an integral part of the ZT 260 make up as well, was mounted in a less than ideal position where the wiring could and had been disturbed. Unlike the Mustang or ZT 260 that uses a standard and reliable moulded plug, the 500’s wiring consisted of six individual wires that were simply pushed onto the correct pins in the module connector.
That would not have been too much of a problem but for the fact that there are 12 pins to the module for these six wires, but hey, the answer is surely to look at a 260 (so I did) and then transpose the positions and wire colour codes. The positions on the 260 wiring were indeed useful and I went further to verify that the controller was the same part number and then able to confirm it worked by trying it on my 260. Where it all went pear shaped was the fact that whoever wired this up did a better installation than a Thatcham alarm fitter in using identical colour coded wires and comprehensively wrapping them all into the wiring loom.
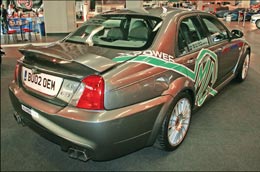
XPower 500 at the Classic Motor Show
So we looked at the wiring diagrams for the Mustang and ZT 260, and then went goggle eyed trying to transpose one against the other. Next, we took the results to the car with plenty of clean sheets of paper, a multimeter and carefully traced every wire’s start and finish. This of course required a certain degree of interior strip down, plus at this time there was no clear indication where the ECU was located. The following exploration under the dash was interesting…
Following the wiring and then extracting the excess length from under the dash was like finding a coiled python. Extracting it revealed a lump rather like a recently eaten rodent, all wrapped up in the loom. Curiosity and a need to know what it was revealed a Ford ignition key taped into an ignition barrel. It became clear that this was obviously a complete Mustang wiring loom. The key is a type with a chip and the barrel with a transponder allowing the chip to be read when inserted to disengage immobilisation. A bit of a novelty as this car has two ignition keys and a separate starter button.
Now the EEC V ECU became visible and when extracted it was found to be displaying both Ford and Vortech ID labels. This was good news as it meant the pin positions of the ECU would relate to the wiring diagrams and so the pin positions could then be cross referenced and as each function was confirmed a label was added to each previously anonymous wire, which in turn allowed each wire to be fitted to the correct pump controller pin – progress.
There was one other small interesting find and that was a very thin pair of wires that emerged from the loom and went off behind the dash. Following these and extracting them eventually came upon a small green LED at the end which would flash at a constant rate when the ignition was live. As this didn’t seem to have any negative influence it was returned from whence it came, but if there is any EEC V wizard out there who can provide an interpretation of the flashing and how we can possibly make use of it please do contact us. Failing anyone coming forward we may bring it out again, but only for Christmas.
Our examination revealed a number of other negative issues, the main electrical power cable touching the right exhaust manifold, even though said manifold was wrapped in the heat resisting exhaust wrap. A number of wires were found just hanging loose in the engine bay and for whatever reason one of the plastic skinned handbrake cables was secured to a bracket welded on the exhaust pipe. Other aspects fell short of what I would regard as minimum standards for a road car, but this was a concept, criticism would be justified if the car was built with the intention of being driven rather than for static display.
Having now seemingly got the engine management wiring sussed the next aspect was to check for oil and fuel and see if the engine would start. Oil yes and sorting the pressure sensor confirmed that oil pressure was present on cranking. Cranking the engine was somewhat begrudgingly followed by the bellow of eight cylinders waking after a long sleep, but in deference to the lack of coolant and sick radiator that was all we could do until a new radiator was manufactured and fitted.
Once the rad was replaced and the cooling system refilled there was not a glimmer of life when cranking. Knowing that the ECU was powering up and now apparently operating meant something a little more basic was probably the cause, so first stop was the check for injector pulse during cranking – none present. Next was to look at the power supply for the individual coils – there was no power supply with ignition on. Operating on the principle that wherever the last work had been done was the most likely area where the problem would be found eventually led to an electrical plug under the right headlamp that appeared to be connected but wasn’t.
The engine now burst into life followed by shouts from around the workshop to switch off because there were now two large puddles of fuel on the workshop floor either side of the car that had been blown out of the exhaust. Clearly a considerable volume of liquid fuel trapped in the exhaust for some time had been blasted out with the force of a fire hose. Prudence then dictated a move outside to a suitably empty spot with convenient positioned extinguishers. Reasoning that the two cats would act as flame traps the engine was started again and allowed to idle and the engine warm, to clear the exhaust or residual fuel. Idle was rough but with a little throttle to hold at a fast idle the engine warmed and the exhaust cleared the last residues. Quite how the cats still managed to apparently work after this bath is amazing.
The one off new style rear bumper and different pattern of exhaust pipe to the 260 meant that no off the shelf rear silencers would fit and in any case would look wrong. This led us to Zero Exhausts in Ashford (www.zeroexhausts.co.uk) who designed and made up the stunning rear silencers from high quality stainless steel. The angular design of the bumper being mirrored in the quad tail pipes, yet it’s in the sound they emit which is exactly right, purposeful, powerful yet not harsh or noisy. Superb.
At this stage the next job was to sort the bodywork out as the car was scheduled to appear at the National Classic Motor show at the end of October 2006 at the NEC, followed a week later by MPH in London. The missing bonnet was easy to replace with a good second hand unit and whilst it doesn’t have the ‘Max Power’ vents seen when the car was originally seen in 2001, it had lost them by the time we had the car at Totally MG in 2003. The missing front and other body kit parts though were a different problem to replace, although we were aware that Dove, a company associated with vehicle manufacturer concept car builds (most recently Prodrive’s P2), was responsible for the manufacture of the XPower 500 bodykit. They were able to supply replacement parts on a one off basis.
The quality of the work carried out at the MGOC Workshop has to be specifically mentioned, as it is the normal high standard to which Steve Kilby and William Holliday always prepare bodies for painting by the highly proficient Mark Langford. Very many positive comments on the high quality body and paint work were made when the XPower 500 was first displayed, and this is the high standard that the MGOC body shop take great pride in and aim for in all their work. Those positive comments have included some from former MG Rover people who had an involvement with the car. The car was praised in terms of the high quality of the restoration work, and also the fact that it’s been saved.
The choice of colour was not easy but the Aurora that the car was finished in when purchased was so extensively damaged that effectively a full respray was necessary. Being a Monogram meant high expense and with paint at around £600 per litre a respray is going to be using around £2500 then add the cost of preparation using Monogram would easily exceed £4000, unrealistic especially as it was not seen in public with this colour. As XPower Grey is appropriate in more ways than one, plus far more cost effective and easier to keep in good condition, this was the final choice. Graphics were also slightly different from the Cardiff original, and without the prominent green stripe front to rear, allowing the other graphics to actually stand out far better and advertise the car more effectively than the early cluttered layout. The finished car and the multitude of positive comment justify the decisions taken.
With the car resplendent in the new paint and graphics it was obvious that the original wheels needed attention as they had a few bruises and a yellowed finish. Refurbishment was entrusted to Pristine Alloy Wheel Refurbishers Ltd in Woburn Sands near Milton Keynes (www.pristinealloywheels.co.uk) and the job they have done in taking out the few nibbles the wheels had suffered, and refinishing them in a bright but very durable finish matches the rest of the high quality exterior finish.
So at this point we have restored the visual aspect of the car to an appropriate standard reflecting the car’s position in MG history, we are know moving onto the restoration and indeed proper development of the car to make it driveable. This is without doubt going to continue the two steps forward and one step back route even more!
Roger Parker