Fitting a Replacement Rear Hub Bearing Oil Seal
Fitting a Replacement
Rear Hub Bearing Oil Seal
When my 1971 MGB GT had its last MoT a number of potential failure points were drawn to my attention. One problem was the ‘tell-tale’ signs of fluid weeping from around the bottom of the brake back-plate on the near-side rear wheel. I had already spotted this fluid staining and was convinced that the problem had been caused by a leaking rear brake wheel cylinder. A new wheel cylinder was fitted and the back-plate thoroughly cleaned but after only a few days the fluid staining had returned. Investigation revealed that the new rear brake wheel cylinder was dry and not leaking. Closer examination showed that the fluid was seeping from around centre of the back -plate. Therefore the fluid staining was not brake fluid at all but oil leaking from the hub bearing assembly of the rear axle. The most likely cause of this leak was a failed hub bearing oil seal.
Approach
Replacing the rear hub seal entails removing the brake drum and rear hub or driving flange. Then taking off the rear brake shoes, springs and retaining pins. Finally, it is necessary to unbolt and remove the back-plate to gain access to the hub bearing cap which locates the seal.
To carry out this work it will be essential to jack up the car, support the body securely on axle stands and remove the relevant road wheel.
There are several approaches to this problem. It is possible to remove the brake drum and axle shaft together after unbolting the axle shaft nut but I did not adopt this method.
Undoing the axle shaft hub nut
Undoing the axle shaft nut can be the most difficult aspect of this job. A good way to tackle this is to remove the split pin and loosen the axle shaft nut before dismantling the brake drum assembly. The axle shaft can then be held firmly by the handbrake while you apply pressure to the nut.
Remove the split pin that locks the drive shaft nut in place and use a 1 & 5/16″ socket and an extension bar to undo the nut. I found that using my torque wrench as an extended bar provided me with enough leverage to free this nut. Sometimes the nut can be very stubborn but on other occasions it will be little more than finger tight. On my MGB GT it required considerable effort to free the nut.
Even when the nut has been undone it can still be very difficult to remove the drive flange or hub. To get the hub off the axle shaft it will be necessary to use a hub-puller.
Removing the brake drum
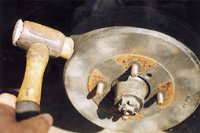
When undoing the two Phillips screws that hold the drum in place use the largest cross head screwdriver you can find. This will greatly reduce the chance of damaging the delicate soft metal heads of the screws. When removing the drum it helps if you slacken off the brake adjusters at the rear of the back-plate. Tap gently all around the drum to ease it away from the hub.
|
Gently tap all around the drum with a soft hammer to free it from the hub. |
Stripping down
After removing the brake drum make careful note of the assembly of the rear brake shoes and in particular the type and position of the springs and locating pins. Place the shoes, springs and pins carefully somewhere out of the way in order to assist re-assembly.
| Undoing the hub shaft nut using a torque wrench as an extension bar. | 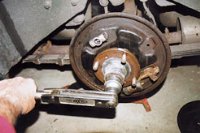 |
Removing the driving flange from the axle shaft.
The driving flange is located on the axle shaft by splines. On my MGB GT this driving flange or hub was a very tight fit and could only be removed by using a hub-puller. This is a special tool which costs around £15.00 and can be easily purchased from an motoring accessory shop or tool supplier.
The hub-puller enables the gradual exertion of a steady pulling force to be evenly applied to the outside of the hub. A fine threaded drive bolt presses down on the centre of the axle shaft and as the bolt is turned the hub is drawn forward along the splines of the shaft. After connecting up the puller it took several turns on the bolt before a sudden bang announced the freeing of the hub which then pulled off the shaft easily.
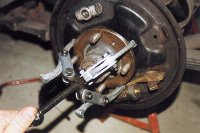 |
The hub-puller in position provides even an and progressive pull on the hub or driving flange. |
Back-plate removal With the hub out of the way you can turn your attention to the back-plate, firstly remove the clevis pin that locates the handbrake cable on the lever at rear of the back-plate. Next unscrew the union nut to release the hydraulic pipe from the rear wheel brake cylinder and make up a suitable plug for the end of the pipe, of course the brakes will need to be bled after re-assembly.
Undo the four bolts and nuts that hold the back plate onto the rear axle. These can be tricky and require a spanner at either end for secure location. Once the bolts are undone the back-plate can be removed from the axle.
Hub bearing assembly
The hub bearing cap assembly can now be separated and the seal revealed. Even if looks to be in good condition, the seal should always be renewed if the assembly is disturbed. Note how the seal is located and then prise it from the hub bearing cap and thoroughly clean all the retaining surfaces.
Fitting a new hub seal
Locate a new seal and re-assemble the bearing cap. Before assembly put a smear of light grease onto the lip of the oil seal. Coat the joint surfaces of the bearing cap and the axle case with a suitable compound such as Hylomar Universal Jointing Compound. Reposition the back-plate then use the four nuts and bolts to fit the assembly together.
Once the back-plate is in position you can then reconnect the hydraulic brake pipe and the handbrake cable to the operating lever by refitting the clevis pin. The hub or driving flange can then be replaced and tightened into position on the axle shaft with the locating nut. Remember to fit a new split pin once the nut is fully re-tightened. Next the brake shoes and locating springs can be fitted. Once these are in place the drum can be fitted and the two Phillips screws replaced.
Finishing off
Remaining tasks will be to bleed the hydraulic brakes and then re-set the handbrake adjuster on the back-plate. If the oil leak has persisted for some time you must check the oil levels in the differential. With the car parked on a flat surface check the fluid level of the differential and if necessary top up the oil using EP90 for an MGB. Check in your handbook for filler locations and lubrication specifications.
Final check
Replacing the oil seal cured my oil leak and I cleaned up the back-plates at the same time. It is very encouraging to check under the car and see that no ominous damp oil stains have re-appeared.
If you at all unsure about undertaking work on the braking system of your car and you are concerned about its operation then take it to a professional mechanic for inspection.
Richard Ladds