MGF Ball Joint Replacement
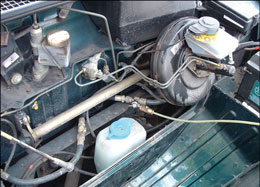
1. Attaching the Hydrolastic pump to the right side suspension valve to depressurise the suspension prior to strip down – note text if this tool is not available
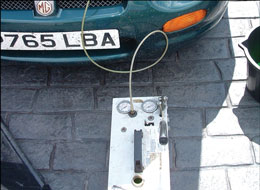
2. View of the Hydrolastic Pump
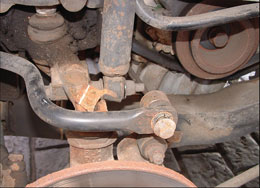
3. Top ball joint nut removed and tab washer displaced. Anti roll bar bolt loosened but not yet removed
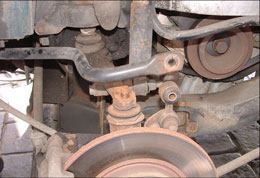
4. Anti roll bar now detached and moved up out of the way. Note this can’t be done unless bolts on both side of the car are disconnected
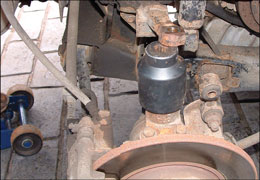
5. Ball joint and top arm separated and the specific Rover Metro ball joint socket in place
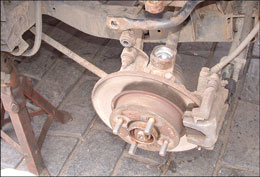
6. Ball joint removed
The average annual mileages of MGFs is not usually as great as those clocked up by other mainstream cars so the wear issues associated with bigger mileages have not been met as frequently as may be expected. Now that the earliest cars are over 10 years old many have higher mileages and owners have needed to face some wear related problems. The suspension is certainly one area where such wear will be found and the obvious candidate is with suspension bushes and of course dampers, the replacement of which has been covered before. Now with the MGF heritage being Metro it also carries over that car’s use of ball joints and here is an area where wear can be expected to demand renewal and indeed MOT failure.
The car in the images is an N registration 1.8i with no specific claim to fame, being a well-used example with 75,000 miles, so it is quite representative of many MGFs. The rear top ball joints though were clearly well past their sell by date and would fail any MOT. It is also worth bearing in mind that since the MGF is noted for the excellent handling and ride when in good condition worn suspension components seriously impinge on both, and has a very negative effect on the pleasure that can be derived from behind the wheel, and all this is before the rapid ‘destruction’ of tyres.
The MGF has the same top ball joints on both front and rear suspension, which are the same as the Rover Metro front upper ball joints. A point to note here is that TF has a different ball joint between front and rear and both are different to the MGF, should a TF owner be thinking about doing this job on their car. The reference to Metro becomes important when looking at the special 17/8” socket that is used to undo and tighten the ball joint. Ask anywhere for an MGF ball joint socket and expect blank looks. Ask for a Rover Metro ball joint socket and the reply is ‘how many?’ Note here again that the Austin/MG Metro ball joints are different sized hexagons – smaller.
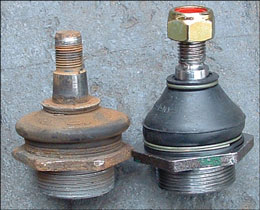
7. New and old ball joints. Note the very thin hexagon for removal and fitting – hence the need for a correct tight and correctly fitting socket
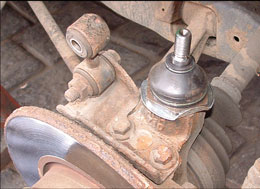
8. New ball joint fitted and new tab washer peened over both on the joint flange and the hub flange
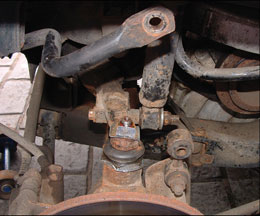
9. Another view of the newly fitted ball joint, plus now the new lower damper bushes and larger diameter retaining washer
Fitting is not that complex, but there are a couple of specifics that apply to all cars with Hydragas suspension systems. Before that I would make the usual safety related statements about ensuring the car is on level and firm ground and that you have the proper gear to raise and support the car. I would also point to the MGF workshop manual for details of the appropriate procedure, and there are reprinted paper copies now in stock with MGOC Regalia. Those of you who may not have an opportunity to get an MGF workshop manual in time to do the job should look at the Haynes manual for Rover Metro, as this specific job is very, very similar on the Metro as it is to the MGF.
The first issue with this job when the car is safely raised is to relieve the tension on the suspension to allow disconnection of the top arm from the hub assembly. I was fortunate in having invested in a Hydrolastic pump some years ago, so depressurising the system to allow that relief of suspension tension top arm becomes a doddle, but for most this is not a tool they have or can easily borrow/hire. All is not lost though as if the suspension is jacked up so the weight of the car is taken through the suspension then the upper arm will deflect upwards and provide clearance between the underside of the top arm and the bump stop. Fitting a wedge in between these two has been the time honoured method, which when the car is lowered back onto the axle stand, and the suspension allowed to droop, it loses the tension and allows room for removal. The Haynes Metro manual details this method.
The images show the various aspects of the job that starts with removal of the wheel, followed by removal of the anti roll bar to link bolt, peeling back the ball joint lock tabs on both the ball joint pin nut and the ball joint to hub. The ball joint pin nut is then removed and with the assistance of a ball joint separator (or the not uncommon shockwave method!) the pin is separated from the top arm. With the Hydragas system no longer tensioning the suspension it should be possible to separate the top arm and move the hub and ball joint to one side. Note that if the anti roll bar link was not disconnected you would not be able to separate these two, and to enable the bar to be raised out of the way the bolt on the other side of the car was also removed.
Once it is to one side the ball joint socket is fitted over the ball joint and a few taps with a hammer ensures that there is full engagement on the hexagon of the joint. There is not a great depth on this so it is easy to slip off. Irritating if you have air tools, potentially painful if you’re using a lever and hand tools. Indeed here I suggest that a good length lever be used to exercise better control on the loosening, which is not actually that difficult and once the tension is broken the joint often unscrews by hand.
Comparing the new and old joint in the image fails to illustrate the floppy nature of the worn joint to the distinct firmness of the new one, the small degree of free movement being quite significant in altering the suspension geometry in a variable way.
Fitting the new one follows the tried and over used statement, ‘refitting is a reversal of the removal procedure’. I would mention the importance of using new tab washers as supplied in every replacement ball joint kit (that I know of).
Whilst the work on the ball joint was ongoing the lower damper bushes were worn. The outer washers also were too small in diameter, so the damper eye could slide over the washers. Not a very good situation and something that was specific to early MGFs, and damper disconnection in this way has been seen. Simply undoing the damper lower nut and replacing the small diameter washer with a larger diameter one would be enough if this were all that was being done, but replacement of the lower bushes means removing the damper. This is a very simple job as long as the bolt is not seized, and before refitting it was treated with copper grease to help ensure it doesn’t in the future. Incidentally the upper damper bushes were still serviceable.
As both rear upper ball joints were to be done the rear anti roll bar was the last item to be reconnected before the wheels were refitted and the car tested. Finally the suspension was pumped back up, with appropriate care to initially the nominal 400psi and then trimmed to the correct ride of 368mm. Where the suspension was not deflated and the wedge fitted into the front suspension, the suspension was once again jacked up until the car’s weight took the pressure off the wedge and it was removed.
The result was a much more secure feeling and quieter rear suspension operation. However, the occasional knock at the front pointed to the next job, and that was with the track rod ends. The front ball joints though didn’t need changing, but had they needed to be, then the same approach as applies to the rear is followed.
Roger Parker