MGF Head Gasket Replacement – Part 1
HGF – Three little letters that strike fear into many owners and potential owners of the MGF, and to a lesser extent with MG TF and other MGs using the K series four-cylinder engines. HGF, Head Gasket Failure, is a condition that has become as connected to the K series engine as MGB is to Abingdon, even though different models suffer at different levels. Specifically the MGF (and Land Rover Freelander) have suffered a disproportionately high rate of failure that has given rise to a common expectation that HGF will occur. A more detailed analysis was covered in the October 2006 issue of Enjoying MG, which breaks down the failures and how the failure rate has dramatically reduced over the years the cars were in production. Early MGFs though are likely to suffer this problem more frequently, not least because many have now accrued high mileages. Workshop manuals for the MGF have only ever been the factory ones, and no Haynes or similar have been produced, and so for this reason here is a guide to repair.
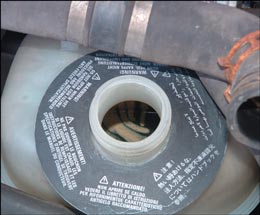
Header tank oil contamination
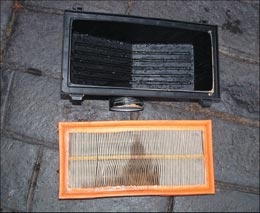
HGF oil and coolant mix contamination in air filter
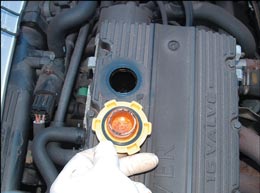
Inside oil filler cap coated with ‘mayonnaise’
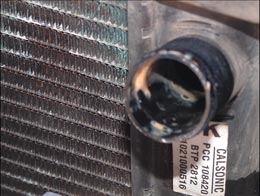
Cooling system oil contamination
Firstly let us look at the symptoms to look out for as it is always very important to catch this problem early before any related engine damage can develop and add significantly to the repair job – and the cost. The point here is that it is usual for a HGF to develop over a period of time and not to suddenly fail, and although many failures do give the impression of being sudden, many do have earlier symptoms.
The commonest early warning is a loss of coolant, usually a continuing problem with a need for regular topping up and often not very much per week. There are other faults causing coolant loss, such as a defective expansion tank cap, corrosion/stone damage to the radiator, water pump leaks, etc. However, most of these will also at some time give a pointer with some puddles of coolant under the car, staining around the leak point etc. Where there are no visible signs of where the coolant is escaping from – and to – you have to widen the search and consider that it is leaking into parts of the engine where it should not.
This will of course be the sump and mixing with oil. In small quantities it will be boiled out by the temp of the oil and the vapour dealt with by the breather system, but when this is an ongoing issue with a continuing leak inside of the engine crankcase, it becomes moisture laden and that then sees the mix of oil and water droplets to form that characteristic creamy emulsification commonly called mayonnaise. The dipstick and the oil filler tubes are the common areas where you find evidence of this mayonnaise with spots on the dipstick or a covering inside the oil filler tube and on the underside of the filler cap. In severe cases of coolant to oil contamination the oil will change colour and texture to something resembling that of a mix of chocolate and vanilla ice cream, but with none of the attractiveness of ice cream! You will often also find that oil is able to get into the cooling system so that you get similar lumpy contamination that often collects in the expansion and that sits there like melting icebergs!
Those engines with no signs of oil and coolant mixing are not yet out of the woods! It is quite frequent to see failures occur in the sealing strip of the gasket on the outside edge of the block on the exhaust side, so when this fails to seal, coolant escapes out of the engine. Initially this will usually be in the form of a dribble only seen when the engine is between a cold start and at normal working temperature, but as time passes the sealing properties break down further and the leaking gets worse. You can usually see the stains of dried antifreeze down the front face of the block behind the exhaust manifold, but only when you’re able to get under the car. That for most would involve lifting the whole back of the car and putting it on stands to be able to get right under the engine, or having a friendly garage put it on one of their ramps for an inspection that can also include looking at the condition of the two underfloor coolant pipes that also tend to corrode.
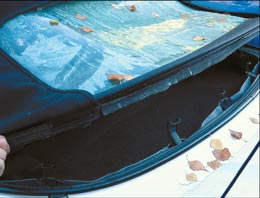
Lifting hood from body for engine access, clips visible
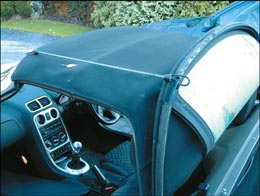
Lifting hood from body for engine access, retained in raised position by bungee strap
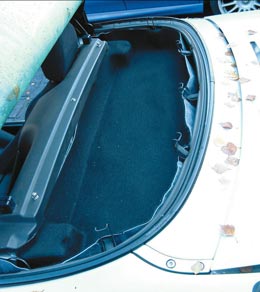
Lifting hood from body for engine access, exposed carpet
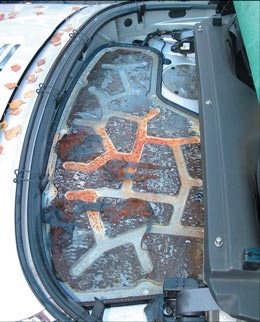
Engine cover carpet and wet insulation removed showing rusting cover
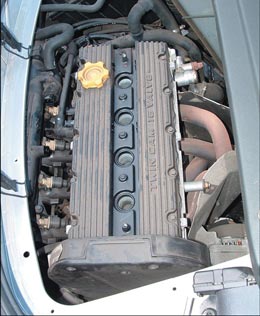
Exposed engine
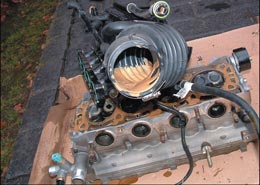
Oil and coolant mix contamination in air pipe. Note this can be checked before removal of cylinder head
Eventually the usual culmination of gasket degradation leads to the sealing strip failing completely for a small section allowing pressurised coolant to spurt out all over the exhaust manifold to turn the vicinity of the car into a Turkish bath. This gives most average owners the fright of their lives as they think the car has caught fire, but as this is such an obvious failure the cars are usually stopped and turned off immediately. Since the steam show is only possible because there is still coolant inside the engine it generally means the engine is not overheated and this has the least potential for engine damage.
Conversely the internal engine coolant leaks can often go unnoticed and this is why these failures are often connected to more serious engine damage. The addition of a coolant low-level warning system to the 2004 on MGTF range was a considerable advantage, and why there is great value in considering buying one of the kits created for earlier cars that don’t have them.
Now that you have a satisfactory diagnosis of HGF the next step is the repair. This is a potential DIY job, but there is a need for several specific tools and without these the job is a non-starter. These tools are an E12 splined socket for undoing the main engine through bolts (often referred to incorrectly as head bolts) a K series cam wheel-locking tool and an accurate torque wrench. Then there is the need for a good range of normal tools. Some nuts, like exhaust nuts and bolts, usually corrode rapidly so there is a considerable advantage in using single hex sockets with a greater contact and grip on these rusted nuts to be able to remove them without that frustrating slippage seen too easily when using bi-hex sockets.
An important consideration before starting is what head gasket is to be used. If a standard single metal shim with the silicone sealing tracks, as has been the standard since the engine first arrived in 1989, then this is the simplest as work is concentrated at the top of the engine. However, if the new Land Rover gasket is to be used and the decision is taken to use the Land Rover recommended replacement new lower rail, then the sump has to be removed, meaning removal of the exhaust down pipe (four nuts to 2001 and six nuts from 2001). Undoing the downpipe to manifold nuts will be very difficult if the manifold has already been removed from the head so this is the time to plan the removal of these nuts as it is for the three downpipe to cat fixings whilst the exhaust is firmly fixed and you have something to lever against to loosen the nuts. If (or when) a stud shears off, as they often can, then you have time to plan and affect a repair.
Once this is done you can drain the oil and leave the sump plug off for as long as possible to allow the engine to drain the mix of oil and coolant. Ideally leave the sump plug out until the residues have stopped dripping. Now you can move to the top of the engine, once you have found your way in!
Access to the top of the engine is gained by firstly removing the grille at the forward end of the open boot and placing it to one side to avoid it being damaged. The hood is then released from the screen to remove tension and then you can access the five spring catches that hold the rear edge of the hood into the channel that runs around the rear of the cockpit. With these removed you have to ease the lower rail of the hood up from the body, but once it is released it can be folded up and forward. Note here that the same issues about protecting the rear Perspex window from cracking when the hood is lowered in normal use apply to this manoeuvre, so it is best if the window is unzipped first. Once the frame is folded upwards then it is secured using a soft bungee strap or similar.
The rear carpet on top of the engine cover is now removed, noting that it is often bonded to the insulation underneath. This is usually tight to remove because of the many cuts and flaps it has that get caught as you try to lift it. It is also often much more difficult on 2000 model year and later cars as it is a tight fit under the rear speaker box. Once out check that this insulation is not wet as I have come upon a few that have been wet, some very wet indeed.
You’re now faced with the large and odd shaped engine cover that is held in place by eleven 10mm headed bolts, three front ones of which on those 2000 model year and newer cars are a real pain to reach. On a TF there are also two extra 13mm headed bolts, which are the anchors for the two engine bay braces specific to the TF. They are all removed to allow the cover to be lifted, then fiddled, jiggled and finally twisted to remove it from the car. This complex description is intended to emphasise that you have a fiddle to get this by the three obstructing centre hood frame catches, but it will come out eventually.
Once removed do not be alarmed at the very dusty engine in front of you, but then consider why you need a good air filter and why the cone type sporty replacements are not as advisable as the fully enclosed ones, which draw air from less dirty places.
The tools you have available will have an impact on the route you now follow, as access to some nuts and bolts is difficult. Some people find it better to remove the head with inlet manifold still attached, whilst others prefer to remove the manifold first. I have tried both methods and whilst access to the inlet nuts and bolts is tight, it’s more than offset against the fiddle of removing all the electrical plugs and fuel lines (newer cars benefit from a common multi plug that aids electrical component disconnection). For this feature I shall assume that the inlet manifold is to be unbolted, which makes it easier to lift the head out of the engine bay.
Before starting, create some protection for the rear wings as a there will be a great deal of leaning across these, you can buy specific wing protectors. Watch the type of clothing you wear and avoid anything with exposed zips and buttons, even plastic, as these may damage paintwork as you’re leaning over the wings, and sometimes cussing, with full concentration on the job in hand. Even protect the areas where you feel you’re not going to lean against the body. I even know of some people who also remove the driver’s seat and hood/frame to allow them to stand in the car to gain better access, but this is not something I have ever found necessary.
To be continued next month.
by Roger Parker