The ‘O’ Series
The ‘O’ Series MGB
Roger Parker continues the story behind his ‘O’ series engine conversions with a description of the four main specifications available
This route is potentially the cheapest one, as donor vehicles are very much past their sell by date. In fact the main difficulty may be in actually finding the parts in a breakers yard. I include this now as there may be a demand from some to be able to create something that is historically as accurate as possible.
This specification is intended to mimic as close as reasonably practicable the twin carburettor specification that would have been delivered by Abingdon. The main donor for this is a Sherpa van, these were made up to 1981 with the 1.7 and 2-litre ëOí Series engine and MGB style gearbox. The ideal is to get hold of the 2-litre engine (engine code 20H’-) as it has so many small features that make transplanting into an MGB easier. One down side for this engine is a low compression pistons giving 8 to 1 compression. Saloon cars have a much more useful 9 to 1. Being a flat head design engine there is no easy way to raise compression other than by changing pistons. The engine is likely to need a rebuild so the use of high compression saloon pistons will be an easy way to raise the compression.
The van may not have an overdrive gearbox so the original MG gearbox can be used. There may be some differences in the clutch release, such as the use of a roller bearing instead of a carbon thrust so since you will be using the Sherpa 2.0 litre clutch use the Sherpa type clutch release and bearing too.
One big benefit of this very early engine fit will be that no modifications from the gearbox rearwards are needed. This leaves only the engine bay to have a number of changes made. The biggest one being to fabricate the engine mountings for the new engine. This should not be a significant problem and there will be much more time spent sorting smaller less obvious items.
The original MGB fuel feed to the engine bay is ideal and simply needs to be adapted to the slightly altered position of the carburettor(s). On that front the ideal would be to find a Rover 2000 SD1, or Ambassador HLS, and raid the twin SUs and manifolds. These will bolt straight on and are worth 10 bhp. The ‘O’ Series has a mechanical pump driven off the cam but a plate and gasket can cover this and you use the MG pump. The original front down pipes of the Sherpa exhaust can be used and simply mated to an MGB exhaust system.
The oil pump is mounted on the nose of the crank and the filter is mounted to the left side and should not interfere with the left chassis rail or inner wing. The water pump and the thermostat housing are in the same relative positions as the B series MGB and so adapting hoses will be quite simple as they follow the same runs as the originals. I have a suspicion that the MGB bottom hose will probably fit. The top hose will be wrong with chrome bumper radiator, but I suspect that the rubber bumper top hose or Sherpa top hose will fit instead.
The more I have gone into the detail of this option the more it shows to have been a logical progression for the MGB. The fact that the engine is not the most exciting has probably prevented anyone mimicking the projected factory ‘O’ series specification. However there is reasonable potential in the cylinder head to have some simple flow mods done, by an expert like Peter Burgess, that should enable the engine to be quite a bit more lively and achieve an extra 10 to 15 bhp. The result would be a very lively MGB and one well able to acquit itself in modern traffic flows. It would be considerably faster than a standard MGB due not just to the extra power but also a much stronger torque band and smoother engine.
In this section we follow exactly the same engine route as version 1, except that from the engine end plate back we have the Rover SD1 5-speed gearbox fitted. This time the ideal choice of donor unit has to be an old Rover 2000 SD1, which will have the 100bhp twin carb spec engine and 5 speed as a complete unit. The 1982 to 1986 Sherpa has the same basic specification as well with the previous mention on the low compression pistons. The gearbox also runs with lowered 1st and 2nd gears, reflecting the van’s load lugging roots, which isnít ideal. The best option being a saloon car version of the gearbox, although the van version can be used with the appropriate SD1 gearchange fitted. The Rover SD1 2000 was also made to 1986, so there is now a much better prospect of finding a donor car, either in a breakers yard or even still running.
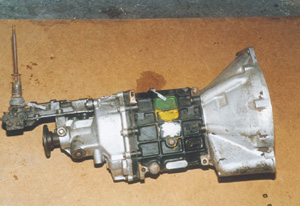
Sherpa (SD1) type LT77 series gearbox with 02 series bellhousing and SD1 gearchange
The first part of this conversion is to make the transmission tunnel modifications to cater for the taller 5-speed gearbox. This has been well documented in many V8 conversions and is exactly the problem that Rover overcame when they put the MG RV8 into production. This modification involves cutting out or reshaping an area of the top of the tunnel.
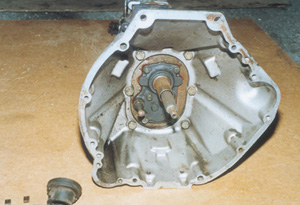
Face onto the Sherpa O2 gearbox showing shape of bellhousing with position for starter on right middle and clutch release on lower left
Once the tunnel height is raised then the other issue is the gearbox mountings. The original crossmember can have its existing mounting lugs cut off, modified and rewelded. You can buy off the shelf mountings to weld to the crossmember from many MG spares suppliers. Finally if youíre feeling flush, pop into your local MG dealer and order part number ZKC6605. Then take a stroll to the bank and apply for a secured loan to pay for it!
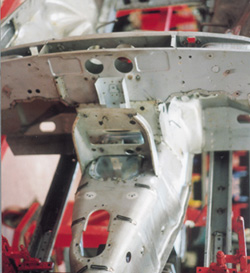
RV8 body during construction but note the included raised section in brighter metal that is fitted in front of the gear lever aperture
The starter may prove to be a little more of a nuisance since it moves across from the right side of the engine to the left, and requires a little reshaping of the tunnel to give it room. The next issue is to move the main wiring across but take care to ensure that exhaust heat and the wires are separated.
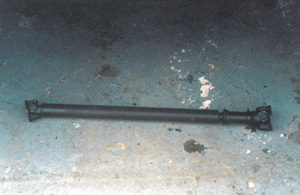
Specially made propshaft 37íí long (31î average for MGB) with large SD1 flange on right end (sliding joint end) and smaller MGB flange on left end
The location of the gearbox then provides the references needed for creation of the engine mounts, which will be similar to Version 1. The engine and ancillaries are exactly the same format as before, other than some differences between the Rover and Sherpa applications. e.g. thermostat housings.
At the rear there is the additional problem of needing a longer propshaft and a new speedo cable. The propshaft can be easily sourced from a specialist or even the original maker of MG propshafts, GKNís Hardy Spicer. A special prop also caters for the difference between the flange size on SD1 gearboxes, which is bigger than the original MG size that is retained on the axle. Speedo cables can again come from specialists dealing with V8 conversions.
The standard SD1 type gearchange remote should be used along with a lever that is cranked slightly forward. This will allow the lever to emerge out from the existing hole centre and not affect any interior trim or driving positions.
This is the specification that I think currently offers the most for least. What I mean is that the use of the later Montego specification of engine means that you can benefit from the considerable in depth improvements Austin Rover made to the ëOí series to create the O2. There is the benefit of some very modern engine controls, but this need not be over complicated, as a single carb version is available. Of considerable note is the fact that the 2 litre single carb has the power of the earlier twin carb specifiction, is smoother and has a wider and fatter torque band. Add the multi-point injection as fitted to the Maestro and Montego EFi and suddenly this is a really very strong specification that creates a superb performer in any conditions. This is before we think of modifications from the original specification. Let me expand and see if you agree.
The first point to make is that it is not possible to bolt up the later ‘O’ Series engines to the MG 4-speed gearbox using unmodified standard parts. However I have had discussions with one enthusiast who has adapted the end plate and other parts to mate an M16 engine to a 4-speed MG gearbox. Since the backplate and block are the same pattern for the M16 and O2 what works for one in this area applies to the other. I mention this simply to illustrate that this is technically possible, but without any personal experience of the detail work involved or the end result it is unrealistic for me to comment further. I also refer back to my original stated aims concerning the use of standard parts.
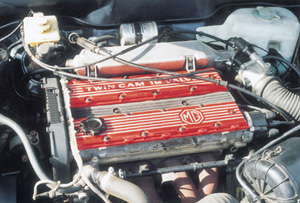
A one off design of M16 rocker cover giving food for thought as to what might have been
The best route is to source an engine and gearbox assembly with all ancillaries direct from the Post 1986 Sherpa, along with the engine bay wiring loom and ignition ECU. Obtaining the complete package from a single vehicle is so much easier, and then the one or two individual parts needed to ëhoneí the specification can be obtained elsewhere.
The later Sherpa engine has fewer differences with the saloon car range, for example the same compression ratios are used and the same power is created. Then if you want to change from a carb to injection it becomes a bolt in operation, at least as far as the engine is concerned! All engines have an oil filter position that will want to go where the crossmember is so minor crossmember mods, a filter adapter and remote filter head are needed.
The other parts needs, will be an SD1 type of remote gearchange extension and lever and ideally a saloon car specification 5-speed gearbox. This is for the same reasons as stated in the previous section and once again the van box can be used, but I regard them as second best. In fact the original MG gearboxes display much the same gearing, but for different reasons, so whilst the saloon car versions are best, donít write off the van versions especially as they will probably be cheaper, and form part of the ëdealí to buy the engine.
The gearbox fit to the car is the same as the previous specification, as the only difference will be in the detail shape of the clutch housing. The SD1 remote gearchange simply bolts in place of the Sherpa and the same guidance as before apply to the speedo cable and propshaft. Starter position is the same as for the previous 5-speed fitting and the same problems have to be overcome.
The later O2 engines all run with digital mapped ignition with all timing located in a remotely mounted ECU. This limits some areas of modification, but in fairness there is no real need to consider this as a problem but an asset. Only a distributor cap and rotor arm is fitted to the end of the camshaft. In all saloon car applications this is on the flywheel end. When this engine is dropped into an MGB it means the distributor cap and heater want to occupy the same space. One has to give!
This is where another advantage of the Sherpa shows through, as when the O2 sits in the van engine bay there is simply NO space at the back of the engine for a distributor cap. This means that those very kind people at Rover developed a simple adaptation for the front cam pulley wheel and cam belt cover so a compact and flat rotor and distributor cap are fitted up front. If the standard single carburettor is retained then there is no conflict of space between the original heater and any engine parts.
Retaining a single carburettor doesnít really seem right for an MG, does it? Even though the single carburettor set up will give nearly 20bhp more at peak power and oodles more power and torque at lower rpm, than the B series. I have to suggest that for simplicity sake the single carb be used, at least initially. The look may not be right, which I think is based on the tradition of MGs having twin SUs as a performance enhancement, but it is very efficient. The fact is that later single HIF series carbs can work as well as twins, but is useful only where the bonnet wonít be opened much! Of course there is the option of having a twin SU manifold made up which will look right, offer a considerable area for gas flow, but the results will be unknown.
With the single carburettor engine there are two configurations of inlet design too. Some vans have the single carb sitting in a normal position with the inlet manifold between it and the engine, whilst others use the Montego ëreverse mountí type. This ‘reverse mount’ is where the inlet tracts do a 180 degree inward turn so the carburettor is mounted the opposite way to normal to save considerable space. The carburettor fed 2 litre Montegos use the ëreverse mountí manifold except for the Turbo engines used in both it and the Maestro, which have another design that follows a standard configuration.
Another striking difference between ‘O’ and O2 engines is the position of the manifolds, with O2’s on the right hand side of the engine. Being on the opposite side doesnít really present any great difficulties, other than creating an exhaust system, which runs from the ‘wrong side’. However V8s have an exhaust running from this side and they have no real problems! The standard Sherpa cast iron exhaust manifold is good and along with a modified Sherpa downpipe gives a very effective 4 into 2 into 1 run. The details of the point where the 2 into 1 connection is made; will be a matter to sort out when the engine is in situ. As with most exhaust problems it is a simple matter of a few bends and joins to get it to mate to the original pattern MGB system.
Retaining a single carburettor is simplicity itself as the existing MGB fuel supply system is just re-routed to the new carb position. However one of the most attractive temptations will be to use the injection system from a Maestro or Montego. This is where things become considerably more complicated and will demand some extensive changes. Both power and torque is enhanced with the injection, but not by a considerable amount and the decision to use it isnít going to find justification here.
Accepting slight differences between model years of engine, there is just over 10bhp more at the same peak 5500 rpm along with about 10lbs ft produced a couple of hundred rpm lower, at around 2800rpm. Where the injection does score is in the clean and very strong throttle response especially at lower rpm, ideal for strong response in traffic or touring, but remember that the single carburettor engine is still streets ahead of the original B series. Another factor for comparison is the fuel consumption which will possibly be very slightly worse for the injected models, but so close that really there isnít any issue here. Where the injection really scores will be in the ëlookí it gives the underbonnet view and this is the only real justification to follow this complex route.
So you want to fit injection then and want to know what is involved. Well the easy bit is that the engine is the same and only needs the injection manifold and associated inlet tract fitting. The system used on the ‘O’ Series family of engines is the Lucas Hot Wire system. It is a fully mapped system and was in its day leading edge compared the competition.
The first problem with fitting to the MGB will be that the direction of the inlet tract actually points towards the rear of the car, which is a double-edged sword. The positive side is that the bonnet line does mean that there will be space for the throttle body, airflow meter and air filter, which means the induction path goes over the engine or through where the heater sits!
Much of the car’s existing fuel feed system has to be changed. This is to supply the high pressure, high volume fuel supply needed by an injection system along with a fuel return. The route I have followed on all my injection conversions has been to replace the tank with one modified internally to injection standards with a ëswirl potí. The RV8 now supplies a ready made off the shelf alternative to this, but at a price! I would still go for the modification of a new tank, as this will be the cheapest and simplest option. Many radiator repair specialists are able to do the modifications required. Alternatively another option would be to use an external swirl pot which is a little more complicated.
Electrics will need some additional work whether the carburettor or injection route is followed. This is because of the O2’s digital ignition, which incidentally uses the same sensors on the engine with either set up. The addition of injection to the system does add a few more components and much extra wiring. The engine loom from a donor car with this injection along with the ECUs and the specific plug and some wiring from the ECU is needed and from this you make up a separate loom that is simple to interface with the existing MGB wiring. Sceptics amongst you will be thinking it is not simple will be surprised how little wiring there is between the original wiring and the engine management loom. I would add here that making up the loom from the salvaged bits is somewhat more complex!
The results of your efforts will be quite satisfying as you end up with an engine which delivers oodles more torque and power than the original engine but in a way that is similar in character. The engine is a ëpullerí not a rev happy device and this will suit the MGB character admirably it will make for a very suitable touring machine that is economical to run.
This is the option that sits at the top of the pile in most minds and visually it is the strongest by far. Certainly this is why I went ahead with such a project and since then I have done another as I have indicated in the first section. The development of the 16 valve conversion to the ëOí Series engine reflected the acceptance that the 8 valve design had significant limitations. The engine designation became M16 and was the standard Rover 2 litre16-valve unit until 1991 when an improved version of the engine appeared under the guise of T16.
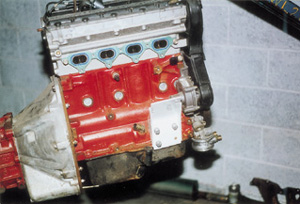
All Sherpa parts fitted to an M16 engine ready for fitting into an MGB. Note that an 8-Valve O2 engine is exactly the same and original O series will be visually similar. Note also the fabricated engine mounting and the spin on remote oil filter adapter fitted to the oil pump. Both also the same as O2 applications
The beauty of the M16 (and T16) is that the block mountings are exactly the same as the 8-valve engine so any item that attaches to the outside of the 8-valve engine can, in principle, also fit the 16 valve versions. So the creation of an in line 16 valve engine simply follows the use of the same post 1986 Sherpa parts as previously listed.
Fitting follows the same rules as the previous O2 and 5-speed fit, except that now you have a much larger head assembly and so you need more room. The top edge of the cam cover in particular ends up so close to the bonnet that the reinforcing brace halfway along the underside of the bonnet gets in the way and has to be removed or moved!
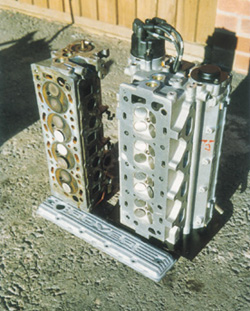
Cylinder heads 8 and 16 valve, on end to illustrate vastly different dimensions
The distributor cap is the same as on the other ‘car’ ‘O’ Series engines and fits on the rear of the exhaust camshaft and there is no easy option to be able to move this to the front. This means the heater has to go to give room for both the distributor cap and inlet air trunking.
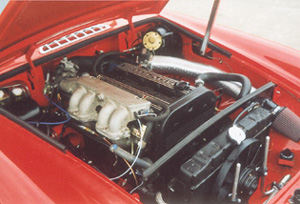
Finished MGB engine bay with 128bhp at the wheels M16 with a standard spec other than induction and exhaust changes
All 16-valve engines came with injection, however there were two types, a single point system and a multi-point one. Additionally there are two operating systems, Lucas Hot Wire as found on EFi Maestro and Montego, and MEMS for both single point and very late multi-point. There was a significant difference in peak power between the single and multi-point of some 20 bhp in favour of the latter, 120 to 140 bhp. However the torque differences were far less and actual ‘on road’ performance differences was smaller than this numerical difference indicates. The fitting of the multi-point injection follows a similar route to the 8-valve injection, but with far less space to work in due to the bigger head. The single point system offers many space advantages because as it resembles a downdraught carb set up.
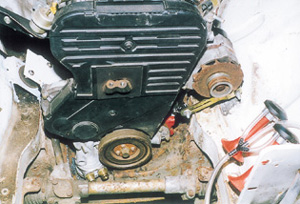
Trial fitting of an M16 engine into an MGB engine bay. Note the interference of the oil adapter to the crossmember, which allows oil pipes to run under the steering rack. The alternator on the right also requires some extra clearance from the inner wings to allow a reasonable range of adjustment. In this specific application the chassis engine mounts are steel sections welded on top of the chassis rail to create a triangulated shape for rigidity. This avoids conflict with the steering pinion shaft and easy fitting of later rubber bumper type of mounting rubbers. Other versions have used original pattern MGB mountings repositioned on the chassis rail with later MGB rubbers
Wiring for the multi-point system follows almost the same lines as the 8-valve system but the single point system was the first MEMS based unit with a single ECU in the engine harness so conversion here is simpler. Clearly all the fuel system modifications described for the 8-valve conversion applies here too.
A slight variation with this engine is one I have been working on for a while and that is to convert the single point inlet manifold to take a twin choke downdraught carburettor. This type of carb is popular in the U.S.A. for MGBs and also common to some Ford and Vauxhall cars. This would probably produce power between the original single point and multi-point systems, yet be very simple to install and set up. Bonnet clearance is an unknown factor at the moment.
Hoses, pipes and cables have to be adapted, but once again, having done the job twice I can say with confidence that nothing is insurmountable.
This time the end result is a quite stunning look when the bonnet is open. The performance aspect is not going to be as far ahead of the 8 valve as may first appear when it comes to normal or even spirited driving in normal road environments. However the improvement in efficiency really shows up with cruising fuel consumption, which is simply stunning, assuming the correct ECUs and set up is configured.
Fitting a more powerful engine is one thing, but ensuring that the car is safe to handle the power is something that has to be sorted before the car is used on the road. There are many proven ways of improving the brakes, suspension and other areas of the car and these must always be considered as an integral part of any conversion that involves the enhancement of performance.