Performance without Consumption – MG ZS (Part 1)
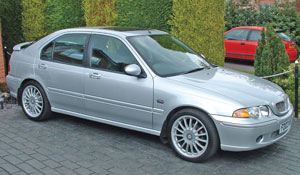
Variation on the Theme – MG ZS
Previously under this title I highlighted the MGF and TF for returning good fuel economy in standard form and advised on how to improve them further.
The follow up covered aspects of downsizing both in terms of what we buy, and also the clear and deliberate move by manufacturers to downsize their engines for lower carbon dioxide emissions and the closely associated reduction in fuel consumption. The peak in oil prices at $147 a barrel in July 2008 was a really sharp stab into the pockets of ordinary drivers, and the subsequent drop to under a third of that by the end of 2008, simply shows how volatile the oil price can be.
Take one original very low mileage 2003 MG ZS 120+
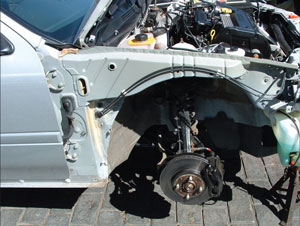
Changing to facelift bodykit style requires comprehensive strip down
The recent high prices and economic turmoil have put car manufacturers under even greater pressure to reduce fuel consumption and emissions whilst holding or reducing costs. There are many examples where naturally aspirated V8 engines have been replaced with smaller forced induction V6 engines, naturally aspirated V6 engines replaced by forced induction 4 cylinder engines and the use of forced induction is also applied to small 4 cylinder engines to replace larger displacement 4 cylinder units. Interestingly the consumer demand for performance hasn’t diminished, they now demand, ‘Performance without Consumption’ and lower emissions too.
How this affects our MGs is hard to see, but it is affecting the development of the new MGs, however as owners of existing MGs there are still some moves that we can make. For the manufacturer downsizing often brings no cost advantage when moving from a large naturally aspirated engine to a smaller but equally powered forced induction one, as the new engine needs to be made from stronger materials to resist the greater stress, and the cost of extra parts like a turbo.
Downsizing is nothing new, a recent example from the MG Rover range was the ZT. These cars occupied the upper mid range sector and that meant smooth and refined performance. As the V6 delivers refinement and smoothness in spades it was a logical choice. The problem for MG Rover was that it needed to sell in greater volumes to companies, which entailed getting the best fuel consumption and reducing CO2 outputs. MG Rover obliged with two specific models, the ZT 120 and the turbocharged ZT 160 1.8T.
The ZT 160 1.8T seemed somewhat contradictory when introduced as there was already another ZT 160. Both models had the same 160ps (158bhp) output, but the original model used a detuned version of the 2.5 KV6 engine and the later 160 1.8T used a specifically developed turbo version of the 1.8 K series engine, hence the title 1.8T, T for turbo. From any comparative road test, or driving, it was clear that the turbo model was better in performance, economy, CO2 emissions, and handling with the 30kg lighter engine. It was not so good on engine refinement, where the creamy KV6 excels, although careful attention to detail reduces the differences so it doesn’t degrade the overall principle. The Turbo K series is actually a very effective and well-engineered conversion delivering a high torque figure from low rpms and maintaining this to the upper rpms range, mimicking a much larger capacity engine.
Only the ZT and Rover 75 production ranges ever benefitted from the use of the Turbo K series engine, although many individuals have applied this engine is a variety of different bays where once a non turbo K series engine resided. Indeed MG Rover were not blind to the potential and put one in a ZR 160, a car I drove and reported on in the July 2006 edition of Enjoying MG (available for members to read on the Club website, search under ‘Publications’, and ‘Missed Opportunities’.)
Two minutes behind the wheel was enough to prove how this engine transformed the performance of a smaller and lighter car like the ZR. It also showed that this was a little bit more than a simple bolt in situation as the ZR engine bay is too tight for the turbo to fit between engine and radiator, so the radiator had to give way. The ZS on the other hand is little different in weight to the ZR, has better handling and more space in the engine bay.
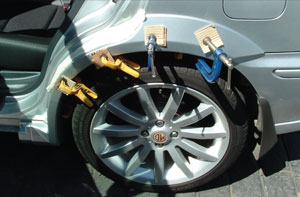
Fitting the various body kit mouldings demands many clamps supplied in the original fitting kit
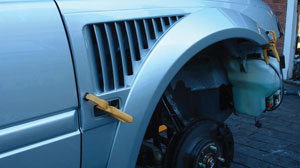
Side ‘gills’ also incorporates a wheel arch lip with the gills projecting through new wings that have pre-formed holes
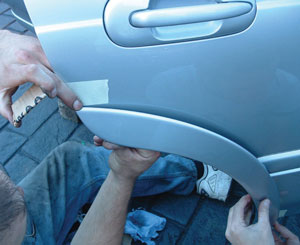
Careful alignment is needed before using the adhesives to provide the permanent fit
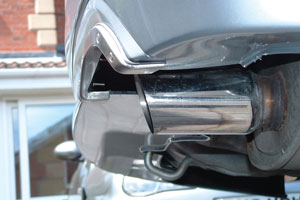
One consequence of the facelift rear bumper style is that exhaust tail pipe ends too short, which presents safety and potential damage issues – see text
No prizes to see where this is leading, because fitting the turbo engine into the ZS works brilliantly, but to get it right involves considerable effort and this series will cover the conversion which not just an engine swap, but a comprehensive conversion. The following instalments will cover how the ZS was converted in many other areas to be fully capable of safely being able to cope with what turned out to be a 70% increase in power and a 65% increase in torque.
Now is the time to introduce you to the owner of this specific ZS, my son Matt. Matt works in the motor trade and amongst various qualifications and skills is an MOT tester. The car was not bought with any specific plan in mind as at the time of purchase it was to be the ‘sensible’ car for daily use, whilst the fun car was a 200bhp 1.9 litre K series lightened Rover 100. Clearly like father like son applies and the prospect of this car staying standard for very long was pretty remote, more especially as this new ‘sensible’ car was replacing the VVC engined 1995 Rover 400 5 door hatch referred to in the previous feature in this series. I will let him take up the story from here.
The Car
Dad found the ZS, a 2003 120+ 5 door hatch model, for sale at a dealership with just under 10k miles and in mint condition back in early 2006. Although buying from a dealer usually means a higher price, especially one as clean as this, the collapse of MG Rover made the dealer nervous of holding any MG or Rovers so the price became advantageous.
Once at home my initial plan was to update the car to the 2004 on facelift body kit style as in my view this was, and remains, the best looking ZS. Engine wise my initial thought was at some time in the future to fit the VVC engine from a recently broken 400. However, the standard ZS 120 performance was a little dull and having had the quite rapid VVC 400 meant this engine change was going to be sooner rather than later. I did fit the ITG Maxogen filter I had on the 400, which noticeably helped but not by a huge degree. Dad’s experience with those ZR and ZS Longbridge development cars with the 1.8 turbo engine fitted showed how much more could be achieved with this engine, plus a mishap with my Rover 100 at the Nurburgring focussed more attention on the ZS.
Ebay is a very useful area to get all sorts of parts and I was lucky enough to find someone selling a complete facelift body kit of parts including the various necessary factory tools and adhesives. This left the search open for the facelift front and rear bumpers, grille, headlamps, front wings and tailgate. Ebay again provided most of these, but new wings (with the holes for the side vents etc) were bought through the Xpart dealer network. A good second hand tailgate was not so easy to find although an ex Longbridge engineering prototype tailgate was found with the flat rear panel, whilst retaining the hole for the external key operated lock/latch. Unfortunately this had a broken rear glass and some other minor damage.
At this stage I had all the parts painted, less tailgate, by Mark in the MGOC Workshop to match the rest of the car. Whilst I pondered about the tailgate the rest of the body parts were fitted over a full warm and sunny weekend during July 2006. Weather conditions were an important consideration as I was taking so many body parts off the car I needed a lot of space and that meant the job could only be done outside, plus adhesive curing times were also a factor. The full conversion is quite complex so anyone thinking of following suit should not take this job on lightly.
Most work revolved around the front end and that was completed first. It started with removal of the original front bumper, both front wings and headlamps. The bonnet was left in place to provide a reference for the fit of the new wings, plus the facelift grille was a simple unscrew the fixing screws to remove and replace with the new grille, with the bonnet remaining on the car.
The replacement wings were straightforward; although you have some new inner panels to fit that sit behind the side ‘gills’. Headlamps were next and whilst they sit in the same mounting holes the wiring and plugs are different between pre and post facelift models. Already aware of this when I was looking for the lamps meant that I also sourced a pair of plugs with a length of wire from a wrecked car. Whilst the front was all stripped down the wiring was altered then the lamps plugged in and tested before permanent electrical connections were made. The issue here was not the connections for the lights, but the connections to keep the motorised headlamp level adjusters working.
The facelift bumper I found did not have fog lamps, whilst my car did. Fitting the fog lamps was not just a simple case of swapping the lamps from the old to the new, as the fixing brackets were different. The new bumper uses a simple bracket that sits on moulded pegs on the rear of the bumper. To lock the bracket in place we used barbed spring steel trim clips that slid over the top of the exposed ends of the pegs holding the bracket firmly in place and the barbs preventing the clip from losing grip on the plastic pegs.
The fog lamps are a common design fitted to many of the late model MGs and Rovers and are held to the mounting bracket with three screws and washers. To reduce problems from corrosion in the future I used stainless steel self-tapping screws and washers. Obviously when the bumper was fitted the original wiring re-connected without problem.
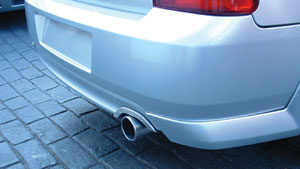
The use of an aftermarket exhaust system shows how the tailpipe is longer and protrudes safely beyond the bumper panel – see text
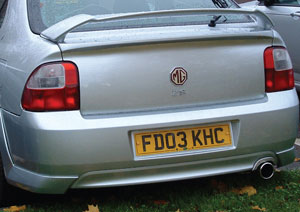
Original tailgate modified to project facelift style without external key opening option. Note too the use of a facelift bib spoiler as well as the familiar larger hatch back rear spoiler and the lower centre section of the bumper
Side skirts were fitted in place of the originals and I used the original fixings. The front and rear wheel arch extensions were attached with a combination of clips and adhesives and getting a good fit between the wings, bumpers and door panels presented a few problems. It’s essential to ensure that any additional drilled holes are correctly placed, and that panels are always correctly aligned first time when using contact adhesives and then held firmly without causing damage while the adhesives cure fully.
The rear bumper I found was from a Rover 45 and so did not come with the exhaust cut out or a heat shield. The bumper needed to be cut and modified to be able to fit these. Although this looks like a simple operation on paper, it’s a task that requires careful marking out before attacking the panel with a sharp Stanley knife.
I laid the finisher against the bumper and marked out the inner line against the bumper which guaranteed additional trimming would be needed. This helps accuracy as the trim is not a good fit against the uncut bumper and deliberately undercutting to start with allowed the trim to be trial fitted again and slight adjustments in the final position for this could be done as there was enough material left in the bumper. Final fitting involved taking small shavings of plastic from the bumper until it sat and look right then it could be fitted permanently with its four screws.
When the bumper was fitted a slightly unexpected issue arose, the standard factory exhaust system that was at this time still fitted was too short and the tailpipe ended before it reached the bumper. Whilst this was a bad idea in respect to getting exhaust fumes into the car, it would also rapidly melt the bumper. The solution was already on hand as the ‘soon to depart’ VVC 400 was fitted with a Piper stainless steel sports exhaust system made for a ZS hatch, and this was transferred. Interestingly the Piper tailpipe is around 70mm longer, no doubt to enable it to cater for both pre and post facelift cars, but whatever the reason it solved the problem. It is worth mentioning that the Piper tailpipe for the saloon ZS is much longer still.
The final change at this time was the use of the body kit ZS 7.5” x 17” alloys that are a half-inch wider than the earlier 17” wheels that were already fitted to my ZS. These fill those wider arches even though the same size tyre is carried over from the earlier models.
Now the car had an almost complete facelift look, aside from the tailgate. At this time the decision was made to modify the original tailgate, as this was a known good fit. Modification involved taking out the number plate recess to give the flat face look, and also to remove the external key lock to complete the clean look. The removal of the key operated external access to the tailgate has not been a great loss as I always opened it using the lever by the driver’s seat.
I did create a double spoiler on the tailgate by fitting the facelift lip spoiler under the standard larger spoiler and it only needed a little trimming at each end to just slot in place, once the holes were drilled in the tailgate for the fixing bolts. This helped the painting, as there was no need to feather in the new paint to the existing as the join was now covered by the additional spoiler. All this work was again entrusted to the MGOC Workshop with William and Steve doing the modification and prep work with Mark once again carrying out the painting.
The exterior now looked great, but I was not happy when getting into the car and being faced with the original dash which let the external look down. Once again ebay provided a facelift dash, complete with switches and with the electrical plugs and some wiring still attached. The dash change is simply out with one and in with the other, refit the heater, air con controls and wiring, the new airbag just plugs in, and even many of the switch functions just need the wiring plugs changed to match the facelift switches. However, some switches changed from a latched type to a spring type with the actual function on the spring type being interpreted by the new SCU fitted to the later cars, a body control computer.
This means three of the original latch type switches were retained, front and rear fog lamps and hazard lights. The fog lamp switches remain where they originally sat in the left side of the instrument binnacle and do not detract from the look. The hazard switch can’t sit where it once did and would look wrong if the facelift centre console was modified to accept it, so it’s now repositioned by the steering column, not immediately in view, but quite accessible.
I also fitted a Trafficmaster clock, an option on the later saloons and one where the clock display is slightly enlarged within the available space in the dash, and a Trafficmaster receiver is also inserted into the clock’s body. This allows reception of the freely broadcast traffic information from the Trafficmaster network and displays warnings of slow or stationary traffic, up to three motorway junctions or 15 miles ahead of the direction you’re travelling in. As this is all self contained in the new clock it was just a matter of unscrewing the standard clock and screwing in the Trafficmaster one.
Next Month – Running gear improvements
Roger and Matt Parker