Technical Tips
Technical Tips
Tax disc holder
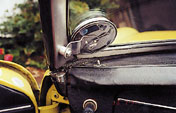
| 1. The windscreen pillar can be carefully drilled and tapped (say) M6 and a motorcycle chrome tax disc holder fitted. Very secure! | |
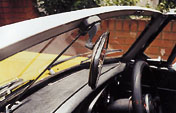 |
2. The mirror stem has been shortened by 1″; the two halves being joined by 4BA studding and Loctite – a boon for taller drivers, for whom the mirror obstructs the forward view. |
Eric Angell
Damp areas in your boot (trunk).
Moisture in this section of your car can be caused by several factors.
1. A poorly sealed seam or rust perforation but more often than not it could be the boot lid seal.
| 2. The seal around the light fittings is often overlooked but it can also rot or become damaged in light collisions and allow water to seep in the boot. Check this out by removing the light unit. Clean the base thoroughly, inspect the seal and the mating surface of the body work. Rust stains on the inside of the car are a give-away. Repair any damage and replace faulty seals, here again black silicone sealant can be used if needed, for example, if there are ripples in this area of the body-work. | 3. Badges or rather their pre-drilled fixing holes can also be a problem. Water will cling underneath and slowly drip inside, yes inside the car, not an easy task to remedy but well worth it. You could de-trim and weld up the holes (not original – but neither is rust) and fix the bonded type. Alternatively, you could rub waxoyl or similar along the entire length of the chrome strip from the outside during warm weather put plenty on and force as much as possible behind the strip! Excess waxoyl can be buffed off, repeat this treatment several times a year. |
Gary Sallows
Blandford Mobile Welding.
Rear main bearing oil seal
On rebuilding the engine of my 1098 Midget which had suffered from various oil leaks, I was amazed to find that there was no conventional rubber seal oil seal on the rear main bearing. There is only a scroll to direct the oil back, my engine was worn and the seal had become oval and persistently leaked. I was delighted to discover that it was possible to buy an alternative three part carrier assembly that bolts onto the rear of the engine block. This assembly carries a conventional lip seal that runs on the flywheel mounting boss at the end of the crank. So far this seal has cured the problem.
Alan Martin
| Tip 1 MG Midget 1500 clutch fulcrum pin – there was an article some time ago about this pin and how, being held only by a circular shim, it could drop out. Having had this happen twice to a newly installed pin and shim., I decided to improve this unsatisfactory arrangement. The shim is the only thing holding the pin against gravity and vibration. Bearing in mind that you have to be very lucky to be able to get the old shim out and put in a new one without taking the gearbox out of the car (ouch!) and that, even then what you are left with is still unreliable, I tried this – Drill out the end of the pin with a small diameter drill, if you prefer, tap the hole and insert a small wide headed bolt which can be made doubly secure with Superglue. Refit the pin from above (it can be done) using a drift to centralise the arm in the hole. My pin has not fallen out since I did this. Surely it would be better to make the pin with a pre-formed head to prevent it dropping through. |
Tip 2 Concerns those dreaded three points circlips used to hold in the rear wheel brake cylinders on Midget 1500s without using special tools. To remove – take off the brake pipe and bleed nipple. Using two screwdrivers, one to prise and one to lift, lift each of the ear at the open ends up out of the groove one at a time, and the clip will spring off. To replace – this is far more difficult. I found it better to re-use the old thinner, spring steel clips. Hold the lower end (open end) ears in the groove on the cylinder, whilst at the same time pressing the cylinder into the backplate (this can be done with one hand – trust me!) and lever the top ear into place using a small screwdriver. I found it better to then rotate the whole circlip so that the open ends faces up, towards the bleed nipple, so that it dosen’t foul the nipple when trying to reinstall. |
Steve Burstow
Copper brake pipes
With reference to ‘In at the Deep End’ by Simon Strange on page 39 of the September issue of ‘Enjoying MG’. Here Mr Strange writes “I brought a roll of 3/16 copper pipe to make brake pipes”. In this department we did research into the use of non-ferrous brake pipes, with the conclusion that plain copper pipe was definitely unsatisfactory for the purpose. This is due to the fact that given a period of vibration, the material can work-harden and consequently crack.
The commercially available copper knickel kits available use an alloy that does not work harden, and are therefore perfectly satisfactory. I feel that it very important that members should be warned not to sue unspecified materials for safety critical applications.
John Stubbs
Head of Research and Materials Testing at AA Engineering Research.
Fortunately the copper pipe referred to by Simon Strange in his article was manufactured by Automec who produced brake pipe kits and brake pipe specifically designed for automotive use.
Richards Ladds, MGOC Technical Writer.