MGB Head Change
Many words (quite a few by me) have been written on the subject of unleaded petrol and its effect on older cars built before unleaded was introduced. The whole subject has often become very emotive and has a prominence far higher than it deserves. In recent months the subject has once again become common amongst questions by owners who have missed the various announcements, magazine features and even TV mentions on the demise of LRP (Lead Replacement Petrol). That is until their local garage either told them that this was their last delivery of LRP, or more often the pump just changes to normal unleaded.
The Club advice that has been given over many years now still stands, although there is now one less option to consider. These options are, in order of practicality, to use a fuel additive for example Castrol Valvemaster approved by the Federation of Historic British Vehicle Clubs (FHBVC) through MIRA (Motor Industry Research Association) testing, or to follow the engineered route of fitting hardened exhaust valve seat inserts and use an exhaust valve of known quality. Thirdly, genuine high octane (around 100RON) leaded petrol can still be bought from certain independent garages but the cost is high and the availability is thin. For a list of those garages still supplying unleaded petrol, you can visit www.leadedpetrol.co.uk .
There is also a fourth option, which is to do nothing and continue to use the car until problems start to develop. These problems will be gradual and not leave you at the side of the road and allow time for you to prepare for work ahead. The point to bear in mind here is that the manner of use of most classic engines will not see any significant increase in problems from using unleaded without mods, not unless the car is subject to motorway type speeds, towing or competition.
Long time MGB driver Andy Birch has owned his chrome bumper 1974 B Roadster for over 15 years, during which time there has been an inevitable need to do bodywork restoration. However the robust nature of the B’s mechanical parts and a relatively low rate of use meant that no major engine work had been necessary. Even so, some years ago Andy saw the need would arise to go the unleaded route so he bought a head that had been modified to run on unleaded fuel, in addition it also had a number of power enhancing modifications included. He chose Peter Burgess to carry out this work.
Now rather than jumping straight in at the deep end and dropping on the new head, Andy decided to wait until a more convenient time and ideally when the first signs of problems with compression and general poor running appeared. Now the head was purchased around 1997, but even so it was not expected that seven years would pass before it would be required, which reflects on how well the car had continued to run in the meantime. The symptoms of combustion problems probably first appeared around 12 months before the change and the final six months running clearly indicated that problems were beginning to affect one cylinder more than others. This manifested itself as a lumpy misfire at idle and just above, but beyond around 2000rpm there was no indication of a problem and the car ran well.
The easiest and most common route chosen to rectify this sort of problem is to fit an exchange cylinder head, which incorporates unleaded modifications together with a full reconditioning process. The actual change is quite simple and straightforward and well within the capabilities of a keen enthusiast and the procedure is more than adequately covered in the widely available workshop manuals. Repeating here what is printed in a manual is somewhat pointless, but highlighting a couple of difficulties that can arise, but are not mentioned, is always of value.
Preliminary checks
In Andy’s car the problems were pretty much identified from symptoms and experience but a few checks were carried out to illustrate this. The first check was to do a cylinder compression check, which of course requires removal of the spark plugs. So a little time was spent examining the electrode end of each plug and comparing it to the others, which can usually be very informative. If the electrodes of each plug show some variation in colour this can disclose important information about different cylinder combustion conditions.
In Andy’s case, the engine had just been run along a motorway for 30 miles with a 1-mile ‘no stop’ run from the motorway to where the work was being done. That meant the plugs would still be showing a good representation of motorway cruising, which should be reasonably clean and even. Knowing the way in which the engine has been running in the period immediately before the plugs are removed is important, as you can then draw more accurate conclusions from associating this evidence with other information. Note here that with today’s fuels there is a marked increase in sooty deposits and black sooty plugs is no longer a sure sign of an over rich mixture.
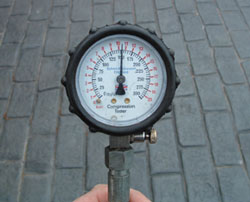
Moving to the actual compression check and the images clearly show some variation and the lower reading was on cylinder number 3. Compression gauges vary considerably in their design, price and accuracy, but generally, they can all provide invaluable information. Engines do not normally develop problems equally on all cylinders so a pressure variation between cylinders usually tells the bigger story, rather than the actual numbers. All cylinders should return results that are within 20psi between the highest and lowest, and ideally within 10psi. In Andy’s engine, number 3 was approximately 30psi down on cylinders 1, 2 and 4. The higher than expected readings for an MGB indicating an optimistic gauge.
Poor cylinder compression |
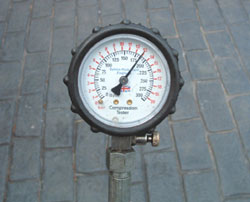 Good cylinder compression |
Loss of compression can be caused by a number of faults, commonly a valve sealing issue, piston damage, piston ring sealing, or a leaking head gasket. A quick check to help indicate if the problem is with the piston rings is to do another compression check called a ‘wet test’. This is the same as the previous ‘dry’ test but before testing add a small amount (approx 10ml) of engine oil through each spark plug hole around the edge of the piston so that it collects on top of the rings. Because the oil is thick and doesn’t quickly pass through it acts as an additional seal. Usually there is a small rise on a healthy engine, but where the increase in compression reading is much higher then it does indicate some problem with the piston ring seal. Andy’s engine was fine with little difference indicating that the loss of pressure on number 3 was due to either a valve or a gasket issue. Some of you may now be asking, ‘what about a hole in a piston as this could give the same results?’ Yes, it could, but a hole in a piston, of whatever size, would also give very clear crankcase compression and heavy breathing that this engine did not have, as would also be found with bad ring seal.
Dirty hands time
Removal of the cylinder head on an MG B is really quite simple and as I mentioned before, more than adequately covered in any of the available workshop manuals, which incidentally, only the very experienced can genuinely say they do not need! Problems outside the manual’s guidance often arise and this job found several!
MGB engines of this age use the ubiquitous capillary type of coolant temperature gauge, with the sender part of the gauge held into the cylinder head by a screw-in collar. A very common problem here is that the bulb part of the sensor becomes seized inside the screw-in collar that should rotate separately. When unscrewing the collar, the bulb turns as well and will then wind up the capillary tube, which easily breaks, thus rendering the coolant temperature gauge useless except for exchange purposes or a very specialised rebuild. So do take care here to ensure that when the collar is being turned that the bulb part is not also turning, and if it is then try to free them before turning the collar more than a few flats of its hexagon. Early treatment with a penetrating fluid some days before doing the job often helps.
Next, do not be surprised to find that when removing some of the manifold, thermostat housing and cylinder head nuts that the studs come with them. If you‘re replacing the head you often need to remove all the studs anyway to transfer them into the new head so this can often be helpful. Less helpful is when you find items like the thermostat housing or head firmly attached even when all the nuts and washers are removed without studs. A few gentle taps with a lead or copper faced hammer on the housing next to each stud should loosen the corrosion grip between stud and housing. If not then you will probably be better off by locking two nuts on each stud in turn and winding out the stud from the head. Studs and holes will need to be thoroughly cleaned of all surface corrosion before being lightly smeared with copper grease before re-use.
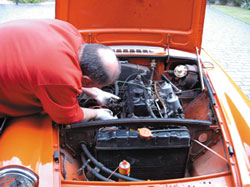
Starting work on Andy’s engine
The rocker assembly removal also illustrated the use by the factory of two thin shims under the centre two rocker pillars, these are often discarded by owners who have found them loose and can’t work out under which posts they came from. The pushrods were carefully kept in the order they were removed and the new gasket-packing card provided a useful means of easy storage for these.
The thermostat housing removal presented a small problem compared to the head, which in this case was so solidly fixed to the block that it appeared to be welded. As Andy’s engine was in its original untouched form since it was made in 1974 the head was very well stuck! One thing that can often help is by turning the engine over with spark plugs replaced so that compression pressure is used to try to break the seal (this doesn’t apply to all engines). Unfortunately in this case just cranking pressure had no real effect, so the next method was to use a lever.
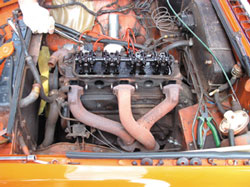
Exhaust manifold just removed from studs, not necessary to remove the whole system
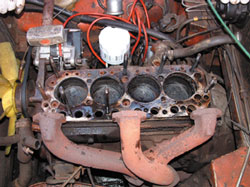
Old cylinder head removed, the mess is normal
Levering is a potentially damaging route but in this case careful levering with a long bar between the top of the water pump body, where it bolts to the block, and the underside of the thermostat housing directly above broke the seal. Whilst still not easy to remove it did finally give up after much pivoting of the head back to front. Often owners faced with this sort of problem mistakenly lever between the head and block face, which damages the mating surfaces, and can easily cause a subsequent early head gasket failure.
Having removed the head the diagnosis of the fault could be confirmed, the combustion chambers revealed the effect of 30 years of use and whilst the exhaust valve of number 3 cylinder was still complete, the seat itself was clearly in a very poor state.
Before any replacement was fitted, a great deal of cleaning was done especially on all mating surfaces. The new head gasket was one that is often described as a copper asbestos type, although for many years asbestos has not been used. The point here is that there is a copper top and steel bottom with the composite material in between and with this type of gasket, I have found a light smear of grease is of benefit.
Before fitting the new gasket, it is worth just checking the face of the block where each stud fits, and just ensure that over the years (or from previous incorrect torque setting) the thread in the block hasn’t been excessively pulled up creating a slightly raised section. A straight edge can check this, and general face flatness, and if any thread is found to have been pulled upwards then remove the stud and lightly countersink the top of the tread to remove any raised part.
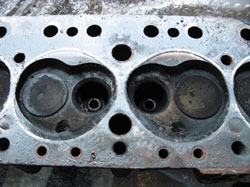
Blacked combustion chambers
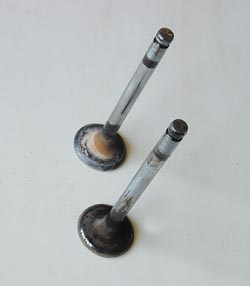
Comparing the valves
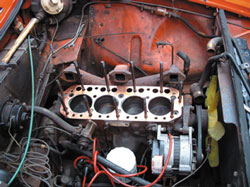
New gasket in place
Another point of note is that the replacement head had been skimmed (in this case by around 0.100”) making it thinner than the original one we had just removed. Immediately that creates an extra problem in that the previously set tappet clearances will be way out, in fact no clearance will exist, and the valves will be held open to some degree all the time. Not so much of a potential issue with this engine with standard cam and rocker ratio, but engines with higher lift cams or hi-lift rockers could see the valve springs coil bind during the head refit that can lead to bent pushrods. For the sake of a few seconds undo the rocker adjuster locknuts and unwind the screw a few turns. You will have to reset the clearances before starting the engine anyway.
The rest of the refit was as listed in the manual including new coolant, oil and oil filter. Now prior to starting up a quick check of the fuel system was done. Today it is not uncommon to remove carbs and even though they are laid carefully to one side before refitting, it is not unusual for a float valve to stick open once the fuel pump is switched on. In this case the back carb obliged by sticking open until the standard tap on the side of the carb body allowed it to seat (HIF4s on this engine). This float valve continued to intermittently give problems during the initial setting up, which as it happened masked another problem.
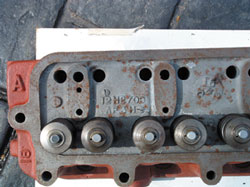
New head
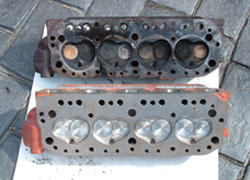
Old and new cylinder heads compared
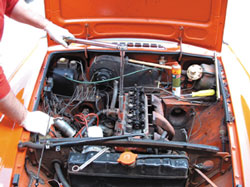
Be sure to torque down the head correctly
With the fuel leak stemmed the engine was cranked over and started almost immediately and ran reasonably well, with a clear crispness and response not present before, but still somewhat lumpy at lower rpms. As the engine warmed and the choke was pushed in, the engine still seemed to display the same sort of miss it had done before the head change. The throttle response was not as sharp without choke and it was clear that there was a need for a richer mixture. Half an hour of twiddling achieved a much crisper throttle response and smoother engine but that low rpm misfire remained, but now it was a ‘soft misfire’. Touch the throttle and the engine responded immediately, was very crisp and clearly running on all four cylinders.
The appearance of a little wetness from the back carburettor’s float chamber overflow pipe pushed the train of thought towards the soft misfire, probably being the result of the float valve not fully seating and allowing excess fuel in at lower rpms. Quite a reasonable assumption as excess fuel does give this sort of lumpy running. However, returning to a point made early on I decided I would just remove the plugs and have a look to see what was happening inside the chambers. It is worth noting that a brand new set of NGK plugs, the same type as removed, and which MGBs have run well on for decades, had been gapped and fitted.
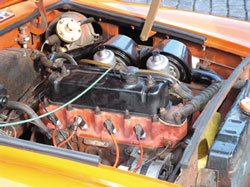
New cylinder head in place
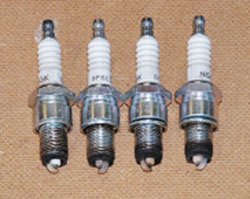
Careful examination of the plugs provides extra diagnostic information, here different electrode colours indicates different cylinder combustion conditions
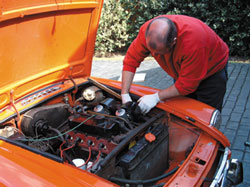
Finishing touches
Coincidentally it was the number three cylinder plug that provided an immediate answer to the rough running, as it was wet with fuel. The gap was fine and the plug was hot from running, but not as hot as the other plugs. Clearly, this plug was misfiring whilst the other three seemed fine. For simplicity the old plugs that were known to work were refitted and the difference was immediate. Resetting the engine’s mixture was simple and done quickly, although final adjustments will need a rolling road to tailor to the needs of the modified head under different load conditions. Even without this, there was a big difference in performance and smoothness, especially at lower rpms.
The point for all to note is that when you’re experiencing a problem and you can’t see the cause, do not simply assume that because you have fitted a new part, that this new part can’t be faulty, irrespective of the brand image. Double check and if this means replacing something that you know was working before then do so.
This job was completed in well under a day at a leisurely pace, and would have been around an hour or so quicker without the plug problem. Andy’s return home was measurably better in many ways, and can perhaps be summed up in his comment, ‘I felt comfortable enough to venture into lane 3 of the motorway to overtake’.
Roger Parker

Job done