| The overdrive unit on my BGT has given many years of reliable service but a few months ago I noticed a reluctance for the overdrive to engage and a tendency for it to switch in and out when engaged. On this first occasion I was able to remedy the problem easily. I checked the gearbox oil level and discovered that it had fallen below the low mark on the gearbox dip stick. Pre 1974 models have a dipstick, after that the gearbox oil is checked and refilled through oil level filler plug. With the car on a flat surface remove the filler plug and check that the oil level reaches the bottom of the filler plug hole. After topping up the gearbox oil on my car, normal overdrive operation returned. More recently when gathering pace in my BGT I flicked down the dash mounted overdrive switch and calmly anticipated the engagement of that higher gear which takes my old MG into a relaxed long legged stride, but nothing happened. Flicking the switch again, just to make sure, did not help, there was still no response and this time checking the oil level did not provide the answer.
Overdrive sump gasket filter
I decided to drain the oil from gearbox then remove and replace the overdrive filter. This can be done from underneath the car by undoing the six bolts that hold the long sump cover plate in position under the overdrive unit. Take great care with these bolts as they and their threads can be easily damaged by rough handling, always use the correct sized socket and apply even pressure. After replacing the filter and refitting the sump, I refilled the gear box with the recommended XL 20w /50 oil and tried the overdrive again, but this made no difference, there was still no response.
Tell-tale signs
If when draining the overdrive unit you discover the remains of the thrust washer or other broken particles in the drained oil, then the unit will have to be removed from the car along with the engine and gearbox and either repaired or replaced with a reconditioned exchange unit.
Overdrive solenoid switch
After renewing the filter and changing the oil, normal operation was still not restored, so I then decided to check the solenoid switch. The solenoid is a key component in the operation of the overdrive unit and is engaged by a dash mounted toggle switch on my BGT, but can be in the gear lever knob or on the
steering column stalk on other Bs. When the switch is selected the solenoid is engaged, current passes through the coil and a plunger within the solenoid is pushed up and holds a ball valve in the closed position. This in turn directs oil from the oil pump to the two operating pistons of the overdrive clutch sliding member.
Electrical power and hydraulic power
If power does not reach the solenoid the plunger will not move and then the overdrive hydraulic system will not engage. Similarly if the push rod is stuck or the ball valve is not seating correctly then the overdrive will not engage. When the system is operating correctly a build up of hydraulic pressure from an oil pump is directed to the two operating pistons and moves the sliding clutch-member, its outer brake surface then comes into contact with the stationary brake ring and the complete sliding member and the sunwheel will cease to rotate.
Checks
The first item to check is the power supply to the solenoid, for this you will need a circuit testing screwdriver. Turn on the ignition, engage top gear and set the overdrive switch to on. Now crawl under the car and locate the power wire to the solenoid and connect your circuit tester to the bullet connector, if it lights up when the clip end is properly connected to earth (the body of the car), then power is reaching the solenoid. If it fails to light up then check the electrical circuit.
Switches and wiring
If there is no power then check back through the wiring and switch system until you find the fault. You will need to check all the wiring and the overdrive switch itself. Gear lever mounted switches and their wiring are particularly vulnerable to failure because of the constantly repeated movement of the gear stick. Wires will often break up inside their plastic sleeve and give an inconsistent performance.
Inhibitor switch
There is an inhibitor switch in the circuit which prevents overdrive being engaged when first, second or reverse gear is selected. This switch is screwed into the side of the selector case of the gear box on a coarse thread. Its position is critical as it must only be in far enough to make contact with the selector rod. This spacing is achieved by the use of fibre washers and the correct number is determined by trial and error. Problems can arise because the switch has a habit of loosening itself. Coarse threads are easily moved and with time, the fibre washers can become brittle and lose their grip. Terminals are also prone to corrosion and becoming loose. It is only fair to warn you that access to the inhibitor switch is very limited and although you may be lucky when trying to reach the switch, it may ultimately be a case of having to take out the engine and gearbox to enable removal, refitting and adjustment.
Solenoid replacement
On my BGT I had power to the solenoid but no operation of the overdrive unit. I had checked the overdrive sump filter and changed the oil in the gearbox. Now it was time to tackle the solenoid. The solenoid is housed separately and you can reach it by undoing the four bolts which hold the square cover in place. Again, be sure to use the correct size socket or spanner and take great care not to use excessive force. The cover can then be removed to gain access to the solenoid without draining the gearbox, however some oil may spill out so put a container in place to catch the small quantity that will drain off. The complete solenoid unit can then be removed. Sometimes it will come out in total or it may come out in parts, if this happens, be very careful not to lose the tiny ball bearing that operates the valve.
Testing
With the solenoid withdrawn, it can be tested on a bench, there should be some discernible movement of the rod or plunger when power is applied. When tested the plunger rod failed to respond, substitution of the new coil and the plunger moved.
Fitting the new coil
A replacement for the solenoid coil is available from MGOC Spares along with a new filter and a service kit of new seals which can be fitted quite easily. However, it is important to be methodical and systematic as you pull the assembly apart. To fit the new coil, take the assembly and press the cap from the housing. Remove the plunger and ball from the body. Remove the ‘O’ rings from the body and replace them. Thoroughly clean the plunger and fit a new ‘O’ ring and then ensure that the plunger slides up and down smoothly inside the solenoid coil. Carefully inspect the ball and its seat in the valve body, check for pitting and damage, if you buy the seal kit a replacement ball valve is included. Reassemble the parts taking great care over the seating of the ball bearing and slide the solenoid assembly back into place.
Replacing the cover
The wire from the solenoid needs to be aligned correctly in the slot of the unit to allow the refitting of the cover plate. Refit the cover plate nuts and washers. It is very fiddly and awkward to re-attach the bullet connector of the wire from the solenoid and the task requires patience and dexterity.
Success
With the new solenoid coil in place I took my BGT on a test run and was delighted when I switched down the overdrive switch to find that operation was completely restored. Once more I was able to enjoy relaxed cruising and improved fuel consumption from a working overdrive.
Richard Ladds
|
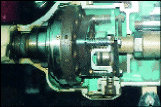
Cutaway of overdrive unit
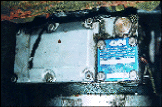
Directly beneath the car, showing the sump cover on the left and the smaller solenoid cover on the right
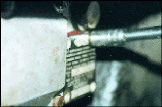
Take great care when undoing and re-fitting the cover bolts
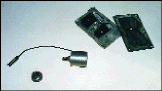
Solenoid assembly with top
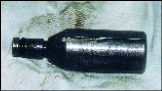
Old solenoid assembly with new coil and replacement sump filter
overdrive solenoid parts
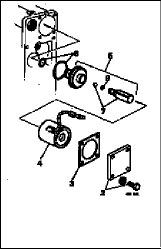
2. Cover plate and bolts
3. Gasket
4. Solenoid assembly
5. Valve assembly
7. Plunger and ball valve
8. ‘O’ rings |
|