Performance without Consumption – MG ZS – (part 2)
Variation on the Theme – MG ZS – Part 2
Running gear improvements
With the desired external and internal looks achieved the next move was to prepare the car to be able to safely handle the hoped for power increase, and to add a little extra reserve for possible growth of performance beyond the initially envisaged levels.
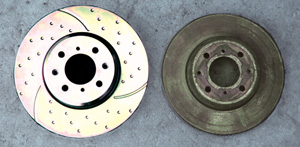
The ZS 120 brakes could have been made to handle the 160ps turbo power level simply by using uprated discs and pads, but since the ZS 180 (and ZR 160) uses bigger discs and calipers both front and rear (280mm front and 260mm rear against 262mm front and 239mm rear), using the 180 parts was an obvious choice. The discs were bought new, but finding the bigger calipers in good condition took much longer than expected as this route is a well sought after one by other MG and Rover owners.
ZS front discs, bigger 282mm ZS 180 item on the left
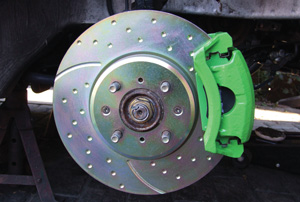
ZS 180 larger disc and caliper fitted as a simple bolt on replacement
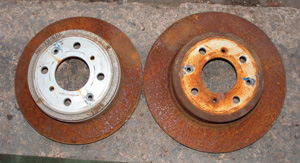
A pair of old rear discs to illustrate the difference in size, standard left, with ZS 180 right
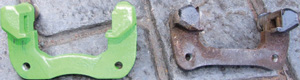
Like the front the ZS 180 rear caliper is also bigger, and here the 180 carrier (left) shows how it spaces the larger calliper over the larger disc
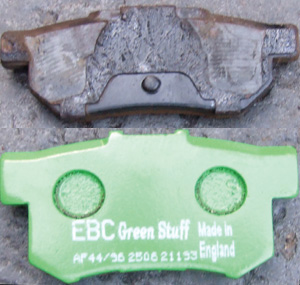
Bigger calipers use a bigger pad showing the 180 pad (lower)
The calipers eventually found were in great condition since they were new and little used as they were fitted to a former MG Sport and Racing Rally car. Once properly checked they were fitted with Club supplied EBC grooved discs and green stuff pads. As they were standard parts fitting to my 120 was simply unbolt the old and bolt on the new. The master cylinder and servo sizes are also common across the ZS range so proper brake balance was not upset and neither was the ABS.
The handling of a standard ZS has been rightly praised by many road testers and is held in very high regard. When something is as good as this there is little to be gained from major change when the intended use is to remain on the road, so the only change I have made was fitting a set of XPower lowered springs, which does as much for the visual aspects of the car as stiffening the suspension, especially with the body kit style. If the car was to become a track day car then there may be more scope for suspension changes, but that is not envisaged. It is worth highlighting the body kit style wheels which are a half inch wider than any other standard wheels at 7.5” and whilst they still use the same tyre in the same size as the previous ZS the car sticks to the road and responds to the steering better.
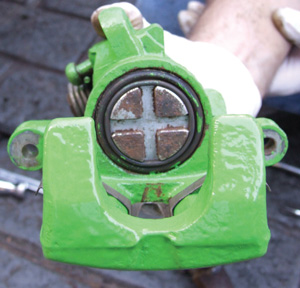
The rear caliper also contains the handbrake mechanism that requires the piston to be held firm for the internal ratchet system to work. A recessed ‘cross’ is used to locate on pegs on the back of the pad
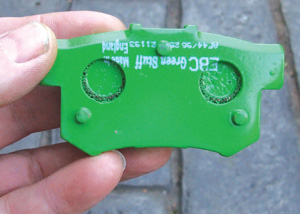
Three pegs are seen on the rear of the pad that engages in the ‘cross’ of the piston, correct alignment is very important
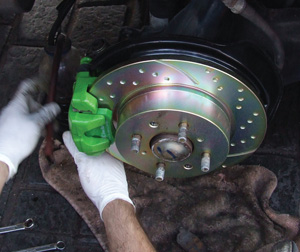
Fitting the 180 parts was a simple bolt on change
The only other small mod has been to use a couple of 10mm spacer blocks under the front fixings of the driver’s seat and replace the bolts with 10mm longer ones. This raises the front of the seat very slightly and stops the slight tendency to find yourself slipping forward over a period of time when driving and copies what Dad did to his old ZS 180. As my car is fitted with the half leather ‘Monaco’ option seats this slipping was more noticeable than on the cloth ZS seats I fitted into my old 400, plus surprisingly the floor pan was quite different between 400 and ZS, leading to completely different seat mountings.
Powertrain…
This for many will be the most interesting section as it covers the engine and transmission, I’ll begin by looking at the transmission as this will be the simpler of the two to cover, starting with the gearbox.
The ZS 120 uses a PG1 gearbox with good ratios and a 4.2 to 1 final drive ratio that results in 21.6mph per 1000rpm in 5th gear. The ZS 180 uses the same gear ratios but with a 3.9 final drive ratio that raises the gearing to give 23.2mph. This demonstrates the good match of gearing to the torque and power bands of the two engines. I had to give some thought about what gearing would be best when changing to the turbo engine. My preference was to leave the gearing where it was and my main thoughts were…
- The acceleration would be significantly stronger as the slightly lower gearing would amplify the already improved torque of the turbo engine. Acceleration being the most important aspect in modern road conditions rather than top speed.
- The difference in engine rpm at 70mph would be less than 250rpm; so when cruising the MPG difference would be small and outweighed by the much better acceleration.
- With real world driving conditions speeds are almost always in the lower half of the car’s potential performance envelope and so lower gearing is better suited to this.
- With the mainstream higher performance saloon cars like Astra, Golf etc producing between 240 and 260bhp from larger engines, which is really a little too high for a K series to match reliably. Keeping lower gearing would help to boost the ZS’s real world acceleration from its smaller engine resulting in comparable acceleration.
- Keeping things as they were avoids the need to recalibrate the speedometer.
With the gearing sorted the next consideration was traction for the significantly increased power and torque. Front wheel drive (FWD), no matter how good, and the ZS chassis is good, is at a disadvantage to rear wheel drive and very much behind four wheel drive. However, having a well developed chassis means the limitations of FWD will not be apparent for moderate power levels and this is where the projected power delivery of the new turbo engine was expected to sit. Dad’s experience in building other high power FWD MGs shows that this area has to be approached with some care, as it is so easy to overpower a FWD chassis and spend too much time standing still whilst the speedo shows 40mph and the tyres melt the road surface.
The 1990’s Rover 2 litre 200ps Turbo cars introduced a TorSen limited slip differential to help control the tendency of these cars to suffer wheel spin and torque steer. When Dad had a couple of demo Rover turbo cars I remember that with 200bhp T16 Turbo engines the 220 and 420 Turbo’s were twitchier than Dad’s MG Maestro Turbo with the same T16 engine but delivering around 235bhp. Dad said it was the way he set the suspension and levelled the driveshaft angles. I was surprised that he didn’t use a TorSen diff, that would have been an easy addition, but he also chose to use longer gearing and match rpms to a true top speed potential. That gave 25mph per 1000rpm in fifth gear using a 3.65 to 1 final drive in the PG1 gearbox so this probably also helped in taming the torque steer.
More interesting is the comparison between this and the ZS gearing and whilst the K series is a sweeter revving engine than the T16, the ZS’s 5th gear is much closer to the Maestro’s 4th gear ratio.
It does rather illustrate where the benefits of a six speed gearbox would lie, but that is not an economic consideration even though they exist.
Dropping the overall gearing to increase the available torque would present more traction issues, even with the better and more effective suspension of the ZS. To assist here I bought a new Type A TorSen diff (again off Ebay). These come in Type A and Type B with the latter being the stronger of the two, and commonly found in the Rover Turbo’s and Rover 200 BRM PG1 gearboxes and both are simple bolt in replacements for the standard diff.
The clutch is an off the shelf item which is currently at 215mm diameter rather than the 228mm item used on the 200bhp Rovers and the ZS 180. This wasn’t really intended as the flywheel currently in use is a standard one and its use was dictated by a change in engine management system used, which I will come back to later. The 215mm clutch is the common fit for all manual Rover 2 litre engined cars, 1800 K series cars and MG Maestro and Montego 2 litre cars, including the turbo versions, plus the Rover 800 Vitesse in 180bhp format. It should not give problems as the ZS is much lighter than the Rover Vitesse, plus many Maestro and Montego Turbo’s were tweaked beyond 200 bhp and lived comfortably with the 215mm clutch, and they weigh about the same as the ZS.
Engine…
Now we come to the engine and the first thing to say is that it is not hugely different to the naturally aspirated 1.8 K series. The essential differences are seen with the lower compression at 9.2 to 1 instead of 10.5 to 1, achieved by shortening the effective length of the con rod by 1mm, so the piston sits lower in the block at TDC. Liners were also different for turbo engines, although today they are a common part for all 80mm bore engines, plus there are various other differences around the engine, such as the oil take off on the pump for turbo lubrication, and an aperture on the lower ladder to allow drain back to the sump.
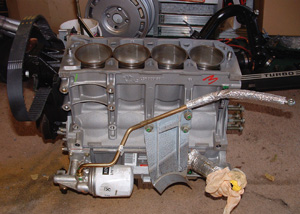
Front view of the engine was built using a widely sourced collection of new parts. Here the bottom half of the engine is built up showing the turbo oil feed pipe rising from the oil filter housing and the oil drain is seen below with a latex glove covering the open end
Dimensionally turbo and non turbo engines are the same, so when it comes to replacing one with the other the main issues revolve around the different ancillaries fitted to the engine. The engine itself is a straight forward fit and I bought my engine as a new half engine to which I added a new head and ancillaries, all found from a range of different sources and built up into a complete unit in just the same way as any other engine would be. Needless to say I used the uprated Land Rover MLS gasket.
Fitting the engine presented no problems but as expected the ancillaries did. Take the obvious issue of clearance between the turbo and radiator. Measurements indicated there would be just enough room, but that the air con equipped 120 format of one fan to the front of the radiators and one between radiators and engine would not work. Placing both fans in front of the radiators was not a problem as this is how the ZS 180 is configured. So a second hand 180 fan set up was found, but the radiator wasn’t the only problem as the turbo engine needs an intercooler. Step forward the Turbo diesel ZS models, which have a neat arrangement whereby the intercooler is mounted at the left end of the radiators with a top inlet in the right position for the hoses to connect from the turbo compressor outlet. Shame about the angle of the bottom outlet, but that can be changed.
Now the radiators and fans were sorted, it all had to be plumbed in, but not until the turbo was in place. Therefore the engine change now had to be carried out in order for all the components to be located in their correct positions. The space between the turbo and the radiator core was very tight, but since neither is able to move about much it was not regarded as a problem and has so far not proved to be one.
Threading coolant, air, oil and exhaust hoses/pipes, plus some wiring through a fairly congested space between the engine and radiator was time consuming, especially when you have to take into account the fact that rubber hoses and a red hot turbo and exhaust pipes do not mix well. The initial plumbing was always just a stop gap to be replaced by purpose made silicone hoses but apart from a couple of annoying occasions when the turbo air pipe has popped off the intercooler and throttle body, nothing untoward has occurred and so the silicone hoses are still ‘pending’.
The hose from the intercooler outlet to the throttle body was the most awkward and the alloy intercooler outlet was cut and welded a couple of times before the current position was found, and this will be something that is changed yet again for another second hand diesel intercooler with a more comprehensive modification to relieve congestion of hoses in this area.
The turbo and exhaust downpipe are standard ZT 1.8T items and I just had to make a simple interconnection pipe to connect between the rear of the downpipe flange and the catalyst flange before it then joins the Piper stainless steel system that I transferred from my VVC 400.
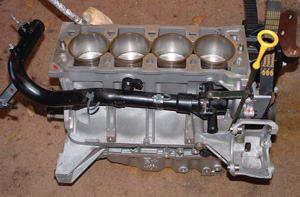
Rear view of the engine and it is interesting to note that a Knock sensor is fitted, although production K series engine never used knock sensing – a development that never quite made production perhaps?
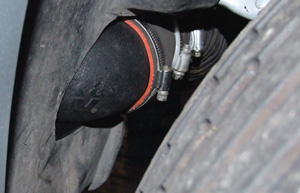
The elbow of the air filter is just visible protruding through the left under wing shield. In this position the filter draws only cold air
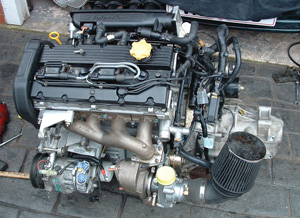
Assembled Turbo engine and gearbox with original plastic inlet and temporary fit of a K&N filter to keep dirt out of the turbo. The same filter was later remote mounted under the front wing (See text)
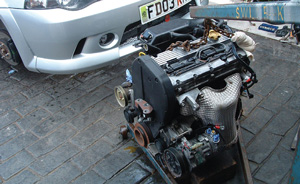
Original 120ps engine removed from the ZS, note the alloy inlet is non-original
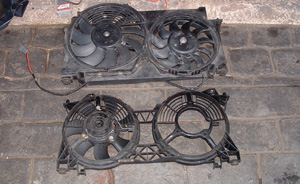
Original 120 front mounted fan (lower), and second engine bay fan, were replaced by the ZS 180 bigger twin front fan set up (upper)
Coolant hoses came from a range of different cars, some current, others far from current, they were taken from the stock in the loft of Dad’s garage and others I have spotted at work fitted to other cars and seen their potential for my car.
Before going Turbo I had fitted an ITG Maxogen filter kit on the ZS which worked quite well. Unfortunately with the turbo there wasn’t enough room with the additional intercooler pipes and hoses to carry this over, so Mum’s ZR now benefits. The ZS 180 uses a massive resonator and cold air pick up hidden in the space behind the wheelarch liner under the front left wing, so this space was used for mounting the filter, currently a large K&N cone type connected to the turbo by an MG Maestro EFi cold air pick up hose.
This Heath Robinson device has proven to be completely effective in both filtering and not offering any restriction to power, plus the parts didn’t cost anything as they were just sitting in the garage.
Once fitted the engine was initially run with the standard ZS engine management, but with the turbo not plumbed into the inlet, just breathing through a filter and hose to ensure debris wouldn’t enter it. This allowed a few running in miles and verified the engine build as successful. When the engine was first started it ran as smoothly as the original engine, if a little less responsive. We had an amusing first check of turbo boost by holding a latex glove over the turbo outlet and just blipping the throttle saw this inflate like a cartoon character attached to an air line then explode, all in a few milliseconds.
Next month: Engine Management
Matt Parker