Small Wonder – The Little MG
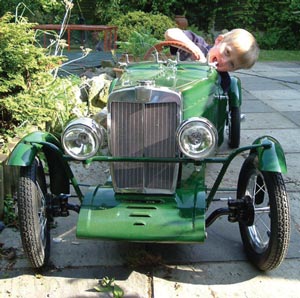
“Here comes the happy father,” grinned the maternity nurse. “Pardon?” came my confused reply. Not that I didn’t know my wife was in hospital expecting our first child. My beautiful daughter Alisha, was 10 days late and my wife, Tracy was due to be induced for the second time that morning. Being caught in the morning rush hour had delayed me on the way to the hospital. This was a blessing, really, as I am not very good with the birth part of fatherhood!
Twin six-volt MGB batteries in situ, when connecting a battery charger or jump leads try to regard it as one big twelve-volt battery
When I returned to work (for a rest) a friend showed me some pictures of the second rocking horse that he was in the process of carving for his grand children. Over the following weeks he kept me up-to-date with progress reports and pictures. “Your Alisha would love one of these,” he kept telling me.
You know what it’s like, you want to try to do everything for your children. Being practical and with time on my hands (I wish), I borrowed his plans and set about carving away. Using the video that he had lent me as guidance, I sanded, painted, stippled and varnished.
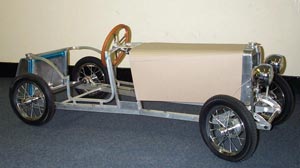
Cardboard body prototype
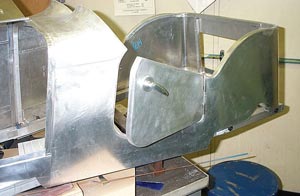
Aluminium body taking shape, already with opening doors and working door handles
During the long process of “horsemanship”, I rushed my wife into hospital on a warm August evening. This time with Tracy clutching tightly to my hand the midwife shrieked, “It’s got dangly bits.” We now had a handsome son, Joshua.
A year after starting the carpentry project, it was finished and my daughter loved it. Now, a few years on, both Alisha and Joshua go horse riding and I would like to think that making “Buckles” had inspired their interest in horses.
Having a son now gave me the opportunity (or excuse as Tracy would say) to begin a second project – a small car or go-kart.
When I was younger my father helped me build many go-karts. Remember the ones made from odd bits of wood, pram wheels and a frayed piece of string for steering? Hours of fun, I still have the scars. Well, I thought I would do draw on that experience, but now being a professional engineer it might turn out a bit better.
Planning and research would be the best place to start. Researching on the internet was frustrating, deciphering all the websites that the search engines threw at me. Eventually I stumbled across a site from a company called Pedal Power and was instantly taken by the cars they made. They were just the type that I was after and made a refreshing change from the Brum look-a-likes that came up on toyshop websites. Intently clicking on all the pages they had to offer, I buzzed up and read an article called ‘Pedal Power’ written by Richard Ladds of an MG K3 made from marine ply. Excellent, just the inspiration I needed. I contacted the company and they popped some more information in the post.
I’d had enough of chisels and sandpaper, so decided to construct the car from metal. An easy decision as I work with metal through the week training apprentice engineers, so I am fortunate to have a resource of machinery to use during my spare time.
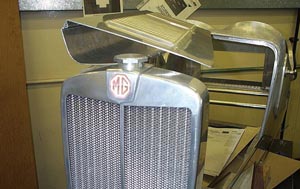
Exquisite replica signature MG radiator and fully folding alloy bonnet
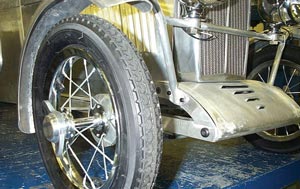
Front axle showing details of alloy chassis
The car’s style? Well of course it had to be an MG. I have three MGBs, but the shape of the ‘B’ would be difficult to recreate in miniature. All those curves would take ages to plan and replicate. Another friend’s father had an MG J2 and was kind enough to let me take lots of photographs and dimensions of his fabulous car. Now this is where my planning went out of the window. The grille in the pictures looked fantastic with its polished chrome and gleaming MG badge. So, half scaling the dimensions that I had taken, I set about manufacturing the grille from aluminium, for lightness. Six parts made up the construction of the grille, which were all welded together. Once polished it looked great (for a while at least) until it caught the polishing mop, hit a wall and crumpled one of the sides. In despair I put it away and started on something else.
The chassis came next, constructed from aluminium box section, again for lightness. I wanted to replicate the form of the J2, so constructed two kinked chassis rails and linked them together with bolted cross rails. This allowed for a light and strong construction and enabled the front cross member, rear axle and the bent grille to be easily bolted into position.
The J2 has the characteristic of positive camber wheels which I wanted to incorporate into the steering mechanism. Heating and bending 20mm aluminium formed the distinctive shape of the front cross member. The links pivot on bearings to make the steering easier for small hands. Wheels, well why reinvent the wheel? I purchased five rear bicycle wheels from a local bike shop. The assistant behind the counter looked at me strangely, “Don’t ask” I said. Why rear wheels? Well, they have a thread where the rear cog is fitted and wire wheels have to have spinners. I did plan some parts of this project.
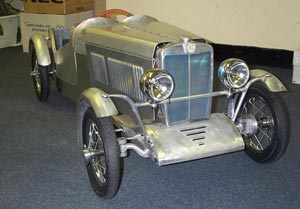
Aluminium body beginning to take shape
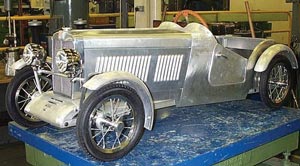
Car fully assembled before painting
Using a combination of a Computerised Numerical Control (CNC) lathe and CNC milling centre the spinners were machined complete with the MG octagon. Polished and screwed into place they looked the part.
The steering wheel was going to be a real challenge to create and once finished would form a prominent feature of the car. So, I sought to recreate the visual appeal of the original four-spoke wheel on the car.
The rim’s basic shape was turned on a lathe and then clamped to a dividing head on a milling machine. This allowed the rim to be indexed through set angles to form the four spoke supports. I then drilled four holes one for each stainless steel spoke. On the rear of the rim there were finger ‘bobbles’ cut into the rim for added grip. The hub was turned on a lathe and the octagon machined on the CNC. The Tufnol material that I manufactured the rim from was a reddish brown colour. I did intend spraying the rim black, but I still like the original shade of the material.
I wasn’t working from any drawings, so the sizes of the parts were evolving from the photographs and the proportions of parts already made. Not the best way to approach a project, I admit, but drawings would take up valuable manufacturing time. When I started, Joshua was just 18 months old, so plenty of time.
A rear slung petrol tank with spare wheel is a characteristic of the old car. This was constructed using a wooden former with aluminium being gently teased around its shape. The whole thing was then glued together and bolted into place. A spare wheel cradle was formed, riveted together and polished to complete the look.
The body was one of the most challenging parts of the build. I knew the shape that I needed, but it was difficult to visualise and make it into 3D. Studying many J2 cars from as many angles as I could from internet images, a cunning plan was hatched. I cut the body shape from card, folded and sellotaped it all together. This transformed the chassis and wheels into the resemblance of a car. An aluminium frame work was formed and welded together. “Opening doors, it’s got to have doors that open” I thought to myself. The only car that I know of without opening doors is the General Lee from the Dukes of Hazzard. So these were also incorporated into the frame work, before aluminium sheet was stretched and shaped around the frame. The body resembled a patchwork quilt where all the individual panels had been welded together.
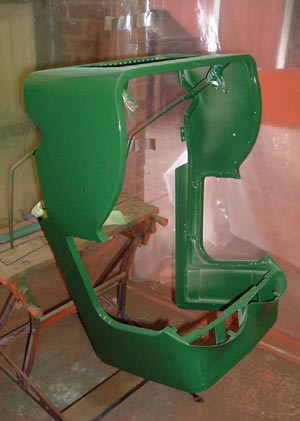
Painting the main body tub
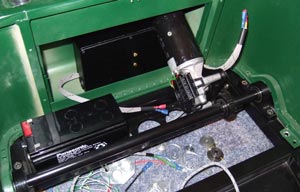
Fitting the power unit
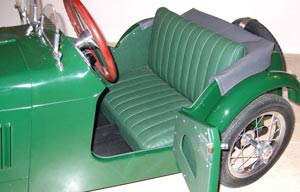
Finished interior note door trim panels
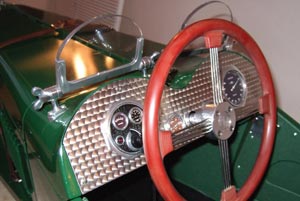
Incredibly detailed dash and replica Blumels style Brooklands four-spoke steering wheel
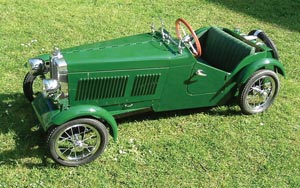
In its nearly finished state the attention to detail and perfect panel fit is remarkable
Many months were spent refining the shape, cutting out louvres and forming hinges for an opening bonnet, until the car took on its present form. Moving the car around was easy while being pushed, but lifting the mass onto a table required two people. It was becoming evident that my aluminium for lightness philosophy had back fired. As for the term ‘pedal car’, I wouldn’t like to have been a four year old trying to manoeuvre the pedals on this car.
I investigated an alternative means of propulsion – battery power. Electricity is one medium that I try to stay well away from. I don’t mind changing a light bulb or fitting a switch, but that’s as far I can go without causing a total power failure.
Calling on expert advice, a circuit was devised that included a 12v battery, electric motor, motor controller and a throttle pedal to vary the speed. This also gave me the chance to introduce working headlights.
The whole car was now escalating into a mammoth project. ‘You won’t finish it’ and ‘He’ll be 18 years old when it’s complete’ came comments from fellow colleagues. Their words may now be ringing true.
I had always wanted to have leather for the seat and interior to give the feel and look of the original car. I couldn’t sew (still can’t) so I contacted a few trimmers in my local area. For the little seat, £150 for a hide plus labour was the cheapest quote that I received. It looked as though leather would be out of the question. Then a trimmer in Maldon showed me some authentic cloth that he used and estimated that he could upholster the seat for about £90. Biting the bullet as they say, I left him the wooden seat frame that I had made, and awaited his call.
I was a little apprehensive as to how it would turn out as I really had my mind set on leather, but to say I was pleased with the result is an understatement. The individual flutes and piping helped to give the interior the authentic look that I was after. Complete with the stainless steel dashboard, fake dials and a working clock, it gives the car the appearance of a J2. The doors even open with a twist of the handles.
Gradually the car was assembled with all the individual parts that had been made. It looked great with its aluminium skin and stunning green interior. “Polish it!” my colleagues kept suggesting. It did cross my mind, but I thought about all the rubbing down and finishing that it would require.
I made a decision, so the car was dismantled for painting. The body work and ancillaries were prepped and painted in the choice of colour. After spraying with many coats of British Racing Green, it was like a brand new car.
“You’re not sitting in it, in case you scratch the paint!” plus other excuses I’ve used not to let Alisha and Joshua play in it. “What a rotten Dad” I hear you say, well I suppose I am. I was only protecting it.
The car was intended as a fun pedal car for my children to roam around the garden, but unfortunately I got a bit carried away…well we all do at sometime. I did buy them one of those electric jeeps to test their driving skills while they waited, and I’m glad that I did.
Well, the car is finished. Unfortunately I took a bit too long on the build than anticipated and didn’t realise how much Joshua had grown – I did get carried away.
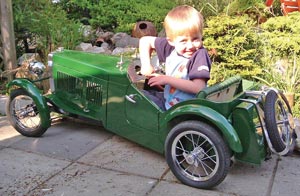
Josuha ready to put the diminutive J2 through its paces
Although I started the project on my own, I would not have been able to keep the momentum going without the helpful advice and assistance of others. The welding of aluminium to an excellent standard is not going to be added to my CV. This accolade goes to Andy Cowan, whose skills ensured all the parts stay permanently together – many thanks Andy.
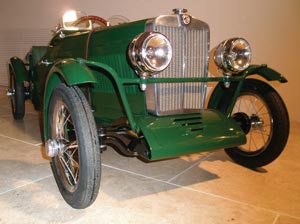
Imposing and intricate, the radiator is a superb replica of the original
It was never my intention to build a model replica of a MG J2, but just base the design on the car and use the features to build an interesting ‘Little Car’ for my children. I hope you like the result.
Paul Johnson