A V8 Special, the Ultimate Classic Tourer
A V8 Special, the Ultimate Classic Tourer
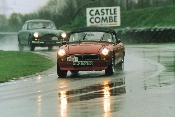
| In the wet at Castle Coombe on the Haynes Two Day Classic |
 In the dry at Pevensey Circuit in Wales on the Haynes two Day Classic |
On the 1995 Euroclassic I fell into conversation with Ken Shipman who was driving a lovely Stirling Moss MGB Replica. We both decided that the ultimate version of the car would be a V8 and based on the Stirling Moss replica. I know that there have been a plethora of V8 MGs in ‘Enjoying MG’, culminating in the Maidstone Sports cars MGRV8 special in the May edition. Well, with the help of the available literature, you can build one yourself. All you will need is time and loads of money. And perhaps an exceptionally understanding wife. This is the story of my V8, which again delves into realms of the unknown by using hardly any standard MG parts, much as I did with LOR999F, my Midget.
I mentioned the idea to a friend he enthused about the concept and told me he knew of a V8 engine and gearbox he could get cheap. In previous article about my Midget I mentioned Hitchcock’s Rules. Here is Hitchcock’s rule No 3. NEVER buy anything cheap from friends. It is the quickest way to lose them. I ignored my own gut feeling and bought the engine. It was supposed to have been an SD1 version. Needless to say it wasn’t. The gearbox proved to be useless also and I had to replace it with a reconditioned one. With the engine I ended up throwing away everything except the block. I wanted an engine with at least 250 bhp, because I feel for road use this is as much as the chassis can be modified to take safely. And a friend with a Porsche kept boasting me that he 240 bhp under the bonnet. So I had to outdo him.
For V8 engines I found Real Steel to be superb. I presented them with my requirements and they came up with the ideal solution. The engine I finally built was overbored 20 thou, stroked out to just over 4300 cc by using a special crankshaft, conrods and pistons, with stage 2 heads and a camshaft rejoicing in the title ‘stump-puller’. It is aptly named. Instead of the usual Offenhauser manifold I was recommended an Edelbrock which is more efficient but slightly higher, but still fits under an RV8 bonnet, with a 460 cfm four-barrel Holley carburettor. The exhausts exit through the inner wings similar to the RV8, which makes the car run far cooler. I was also recommended a Mallory racing distributor. On the dynamometer at Real Steel, Anthony Pinion set the engine to give 251.4 bhp, with almost 300 ft lbs of torque. The cylinder heads were finished off with MG rocker covers from Clive Wheatley. The engine bay looks great. The Rover engine is an incredibly simple design, quite easy to build and tune. On the whole parts are readily available. Modified ones from Real Steel are all in stock.
My search for a suitable shell ceased when I saw an advertisement for an MGB roadster imported from California. The car was awful because it had stood in a barn for about five years since coming into the country, the boot floor had got repeatedly wet and was very rusty. So was the underbonnet area where brake fluid had been spilled. It had an engine and gearbox in the usual place and a spare gearbox in the boot. The colour was mostly blue, with brownish red doors and boot. It was so dented it looked as if it had been used as a dodgem car. The front wings were drilled full of holes where dents had been pulled out. This did not matter very much as at the price quoted I could afford to replace these body panels. I threw away both front wings, bonnet and boot, and subsequently replaced one sill, one A-post, the panel beneath the windscreen and both rear wings. It was still cheap, even with all the necessary new parts.
I will not go into all the details of the rebuild because it is beautifully explained in Roger Williams’ book ‘How to give your MGB V8 Power’, which became my bible for the next year or so. The descriptions are detailed, accurate and helpful, especially concerning conversion to right hand drive.
‘Enjoying MG’ had featured a report on the Maidstone Sportscars MGRV8 special. The suspension development Andy Marsh had done for this car was exactly what I needed. Andy had fitted larger ventilated front discs with coil over shock-absorbers instead of the standard lever arm system. He also fitted rear disc brakes with coil springs and trailing arms with a panhard rod and Koni dampers. I was told that the work was at a very early stage and I could not have the modifications until they were ready. So I waited nine months. Mean time I had plenty to do, as the Midget was still in the middle of being developed.
I needed the suspension fitted before I could do the bodywork, because I was planning on 205 tyres on 15 x 6J wheels, which being very wide, may have required modified wheel arches. In actual fact, the wheels fitted in nicely, with only the precaution of folding the rear of the wheel-arch flanges flat.
The work really began when the suspension parts arrived. The front was easy to do, it is described Lindsay Porter’s book ‘MGB guide to purchase and DIY Restoration’ which is also essential reading for a project like this. I added negative camber and massive Wilwood racing discs and four-pot callipers. Expensive but effective. The rear was totally different. I had to remove the rear anti-roll bar fittings which were incredibly hard to reach, before I could start fitting any new parts. The geometry of the rear suspension is straightforward, but awkward. I had to weld brackets to the body just next to the rear spring hangers. Not so much difficult, as dangerous. Without the advantage of a lift to raise the car nice and high, in the cramped space available to me I kept setting myself on fire! The panhard rod bolts to the axle on the off-side, while the other end is retained by a pillar welded to the chassis. Maidstone Sportscars sent the pillar in separate pieces which enabled me to cut and fit each bit individually, which proved easiest. The rear discs and callipers are modern readily available components. I had to make up a bracket to link the cables to the handbrake, although Maidstone Sports Cars have since sent me a modification. I think mine is neater though so I have retained it.
I would be loath to try any panel work again. It needs lots of experience, preferably gained on someone else’s car. For example the fitting of a half rear wing needs a lot of adjustment, because these non-standard panels are just slightly the wrong size. I was told that the reason is the presses they are made on have worn badly over the years.
| The paintwork and bodywork corrections were passed to Roger Mossop’s Motorspeed at Selsey in West Sussex. The quality of their work is brilliant and have I never met more obliging people in my life. I chose Nightfire Red, a Rover colour, which is metallic and looks really nice on a proper MG. | 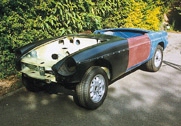 My completed effort in bodywork prior to going to Motospeed for painting |
When I got the car back the rebuild began in earnest. But of course there were new difficulties which I had not encountered solutions. For example I had problems fitting the windscreen to the quarter lights properly. When I asked Roger Mossop how it should be done, he sent his trouble-shooter, Tim, to help me. The problem was soon sorted. I had not realised that quarter lights can padded with washers to get the correct position, when the adjustment of the windscreen pillars is used up. Tim has proved extremely helpful on other problematical bits, such as connecting the heater controls. In none of the literature I have read was it mentioned that the American front cross-member is different from the UK one. So when I tried to fit the steering rack it wouldn’t go on. Andy Marsh to the rescue, he had experienced the problem before and just happened to have a second-hand UK cross-member spare. So off with my laboriously restored example and on with a beautifully finished powder coated one from Maidstone.
The rest of the rebuild was straight forward and has been described many times before. I used wood veneer trim inside the car with carpets and seats colour-coded as discussed with Robin Stockley at John Hill’s. The result can be seen in the photographs.
The gearbox I used, as mentioned, is a reconditioned SD1 example. The transmission tunnel has to be cut and raised in height for it to fit. I will skip the details as it described very well in Roger Williams’ book.
| Under the bonnet I stripped everything down to bare metal. All the various components were also stripped and repainted with black Hammerite. The wiring loom was replaced and so were the brake, fuel and clutch pipes with copper, which has been described as prone to fatigue fracture but if carefully fitted and well supported should be all right. Incidentally, I made up my own brake and clutch pipes. Initially I made the flanges too small on the pipe ends to get a leakproof seal at the unions, so if anybody is planning to do this for themselves, make sure the flanges are either doubled over, or at least as big as possible. It is a horrible job taking off and re-making leaky brake pipes. | 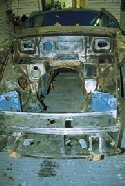 The engine bay stripped to bare metal show the holes for the exhaust pipes through the inner wings |
The car was now ready for the engine and gearbox to be fitted. This is actually much easier than fitting an MGB engine, which is just as well, because I found when trying to bleed the clutch that I could not get any pressure, so the engine had to come out again. I assumed the arm had slipped off the release bearing. But, no, when I had everything apart it was all right. It turned out that the release bearing was not long enough to reach he clutch! After I had puzzled over this for some time, I decided there were three variables. I could either get a longer release bearing, which proved to be impossible, or get a longer pivot, or a longer pushrod. In the end I made a longer pivot from an old cylinder head bolt, so moving the bearing forward to contact the clutch. I then only had to circumcise the push-rod by an inch or so and all was well.
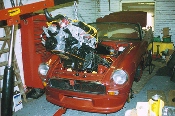 I became expert at removing and replacing the engine and gearbox |
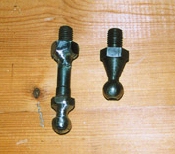 The clutch problem solution is shown the new pivot bolt compared with the original |
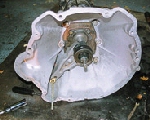 The remade clutch set up as it should be |
For instrumentation I had hoped to mostly re-use what came from an American car. However I needed a different dashboard, sourced second hand from John Hill’s and a V8 speedometer and rev counter. The speedometer only went up to 140 mph. I (hopefully) needed one a little higher. I found that Demon Tweeks sold a Smiths speedo going up to 170 mph, so I had the cannibalised by Speedograph Richfield and then the result calibrated. Their calibration is extremely accurate.
I fitted central locking and remote door locking for convenience. I also fitted cowls over the headlamps. The roof came from Prestige auto Trim Products. It had an insulated lining which makes it much quieter and was not too difficult to fit. It is certainly watertight. One problem I have not yet solved concerns the anti-roll bar, which would not fit under the roof and therefore had to be removed.
This brings me to Hitchcock’s Rule No 4. Never believe what you are told by anyone about car components without first checking. I was told by the people who supplied my reconditioned gearbox that they had filled it with automatic gearbox oil with was written in Lindsay Porter’s book. However I did not check, and when first driving the car for its MoT, I ended up with only fifth gear. Driving through Portsmouth to friend’s MoT garage became a challenge, but there was enough torque from the engine to drive in fifth. It did for the clutch somewhat, however. It was another engine-out and when we looked the gearbox was dry. And ruined. So I was then on my third gearbox! And second clutch. All in ten miles.
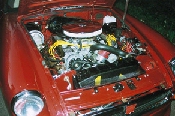
The completed engine bay
Such projects as this never seem to be finished. I drove the car on the Haynes Two-Day Classic, and the ride was impossibly bouncy. I was using competition springs which were far too hard. Good on the circuits, though. I have changed them now for softer springs, which are far more comfortable and so-far seem OK. Andy Marsh found that their cars bottomed with these springs which is why I was supplied with the harder ones. They must build them too heavy! The shock absorbers need adjusting at each spring change, so the best suspension settings are still a matter of considerable experimentation. I haven’t even started on the front yet!
So what is the car like to drive? Awesome is the first word that springs to mind. Acceleration is very quick, after all a lot of horsepower in a relatively light car is a good recipe for performance. Roadholding is good, better in the wet when the Firestones become more progressive, but the car on the road is docile and easy to drive, you hardly need to change gear. The gearing is thirty miles per thousand rpm, so four thousand gives 120 mph and potentially, top speed would be 150 mph. The car is not that aerodynamic, so this might not be attainable. It is acceleration which the big engine gives in abundance that makes the car such a joy to drive.
Sadly due to ill health the car is now for sale.
Bob Hitchcock